WPCargo Import and Export Add-ons Installation

[vc_row][vc_column][/vc_column][/vc_row][vc_row][vc_column width=”1/4″][vc_widget_sidebar sidebar_id=”sidebar_3″ title=”Get Started”][/vc_column][vc_column width=”3/4″][vc_column_text]

WPCargo Import and Export Add-ons Installation

Install WPCargo Import and Export Add-ons

You need to purchase WPCargo Import and Export Add-ons in the WPCargo.com/Purchase page before you can install and use to your WPCargo website.


Download first the WPCargo License Manager in order to install the WPCargo Import and Export Add-ons.

You can download  it here and follow instruction below.

Download the WPCargo License Manager plugin

  • Download the plugin
  • Go to your website
  • Go to: Dashboard > Plugins > Add New > Upload
  • Select the downloaded plugin
  • Install
  • Activate


Download the WPCargo Import and Export Add-ons plugin in the order notification and copy the license key .

  • Download the plugin
  • Go to your website
  • Go to: Dashboard > Plugins > Add New > Upload
  • Select the downloaded plugin
  • Install
  • Activate
  • Add license key in the  WPCargo License Manager
  • Activate license
  • Go to Go to: Dashboard > Shipment > WPCargo Import and Export Add-ons

[/vc_column_text][vc_raw_html]JTNDc2NyaXB0JTIwYXN5bmMlMjBzcmMlM0QlMjIlMkYlMkZwYWdlYWQyLmdvb2dsZXN5bmRpY2F0aW9uLmNvbSUyRnBhZ2VhZCUyRmpzJTJGYWRzYnlnb29nbGUuanMlMjIlM0UlM0MlMkZzY3JpcHQlM0UlMEElM0NpbnMlMjBjbGFzcyUzRCUyMmFkc2J5Z29vZ2xlJTIyJTBBJTIwJTIwJTIwJTIwJTIwc3R5bGUlM0QlMjJkaXNwbGF5JTNBYmxvY2slM0IlMjB0ZXh0LWFsaWduJTNBY2VudGVyJTNCJTIyJTBBJTIwJTIwJTIwJTIwJTIwZGF0YS1hZC1sYXlvdXQlM0QlMjJpbi1hcnRpY2xlJTIyJTBBJTIwJTIwJTIwJTIwJTIwZGF0YS1hZC1mb3JtYXQlM0QlMjJmbHVpZCUyMiUwQSUyMCUyMCUyMCUyMCUyMGRhdGEtYWQtY2xpZW50JTNEJTIyY2EtcHViLTA1MDY1Mzg0MjY0NTY4NzclMjIlMEElMjAlMjAlMjAlMjAlMjBkYXRhLWFkLXNsb3QlM0QlMjIxNjk0OTc1MjIyJTIyJTNFJTNDJTJGaW5zJTNFJTBBJTNDc2NyaXB0JTNFJTBBJTIwJTIwJTIwJTIwJTIwJTI4YWRzYnlnb29nbGUlMjAlM0QlMjB3aW5kb3cuYWRzYnlnb29nbGUlMjAlN0MlN0MlMjAlNUIlNUQlMjkucHVzaCUyOCU3QiU3RCUyOSUzQiUwQSUzQyUyRnNjcmlwdCUzRQ==[/vc_raw_html][/vc_column][/vc_row]

WPCargo Custom Field Add-ons Installation

[vc_row][vc_column][/vc_column][/vc_row][vc_row][vc_column width=”1/4″][vc_widget_sidebar sidebar_id=”sidebar_3″ title=”Get Started”][/vc_column][vc_column width=”3/4″][vc_column_text]

Custom Field Add-ons Installation

Install Custom Field Add-ons

You need to purchase WPCargo Custom Field Add-ons in the WPCargo.com/Purchase page before you can install and use to your WPCargo website.


Download first the WPCargo License Manager in order to install the WPCargo Custom Field Add-ons.

You can download  it here and follow instruction below.

Download the WPCargo License Manager plugin

  • Download the plugin
  • Go to your website
  • Go to: Dashboard > Plugins > Add New > Upload
  • Select the downloaded plugin
  • Install
  • Activate


Download the WPCargo Custom Field Add-ons plugin in the order notification and copy the license key .

  • Download the plugin
  • Go to your website
  • Go to: Dashboard > Plugins > Add New > Upload
  • Select the downloaded plugin
  • Install
  • Activate
  • Add license key in the  WPCargo License Manager
  • Activate license
  • Go to Go to: Dashboard > WPCargo > WPCargo Custom Field Manager
  • Start Adding fields

[/vc_column_text][vc_raw_html]JTNDc2NyaXB0JTIwYXN5bmMlMjBzcmMlM0QlMjIlMkYlMkZwYWdlYWQyLmdvb2dsZXN5bmRpY2F0aW9uLmNvbSUyRnBhZ2VhZCUyRmpzJTJGYWRzYnlnb29nbGUuanMlMjIlM0UlM0MlMkZzY3JpcHQlM0UlMEElM0NpbnMlMjBjbGFzcyUzRCUyMmFkc2J5Z29vZ2xlJTIyJTBBJTIwJTIwJTIwJTIwJTIwc3R5bGUlM0QlMjJkaXNwbGF5JTNBYmxvY2slM0IlMjB0ZXh0LWFsaWduJTNBY2VudGVyJTNCJTIyJTBBJTIwJTIwJTIwJTIwJTIwZGF0YS1hZC1sYXlvdXQlM0QlMjJpbi1hcnRpY2xlJTIyJTBBJTIwJTIwJTIwJTIwJTIwZGF0YS1hZC1mb3JtYXQlM0QlMjJmbHVpZCUyMiUwQSUyMCUyMCUyMCUyMCUyMGRhdGEtYWQtY2xpZW50JTNEJTIyY2EtcHViLTA1MDY1Mzg0MjY0NTY4NzclMjIlMEElMjAlMjAlMjAlMjAlMjBkYXRhLWFkLXNsb3QlM0QlMjIxNjk0OTc1MjIyJTIyJTNFJTNDJTJGaW5zJTNFJTBBJTNDc2NyaXB0JTNFJTBBJTIwJTIwJTIwJTIwJTIwJTI4YWRzYnlnb29nbGUlMjAlM0QlMjB3aW5kb3cuYWRzYnlnb29nbGUlMjAlN0MlN0MlMjAlNUIlNUQlMjkucHVzaCUyOCU3QiU3RCUyOSUzQiUwQSUzQyUyRnNjcmlwdCUzRQ==[/vc_raw_html][/vc_column][/vc_row]

Installation

[vc_row][vc_column][/vc_column][/vc_row][vc_row][vc_column width=”1/4″][vc_widget_sidebar sidebar_id=”sidebar_3″ title=”Get Started”][/vc_column][vc_column width=”3/4″][vc_column_text]

Installation

Choose Hosting

You need to be running WordPress on a self-hosted site.

You can  use Cpanel and Linux hosting but we recommend to use the WPEngine.com.


Install WPCargo Track & Trace

There are two ways to install the WPCargo Track & Trace

  • Download the WPCargo Track  & Trace plugin
    • Download the plugin
    • Go to your website
    • Go to: Dashboard > Plugins > Add New > Upload
    • Select the downloaded plugin
    • Install
    • Activate
  • Search for the WPCargo Track  & Trace plugin from within your website
    • Go to your website
    • Go to: Dashboard > Plugins > Add New > Search Plugins
    • Search for “WPCargo”
    • Install
    • Activate

[/vc_column_text][vc_raw_html]JTNDc2NyaXB0JTIwYXN5bmMlMjBzcmMlM0QlMjIlMkYlMkZwYWdlYWQyLmdvb2dsZXN5bmRpY2F0aW9uLmNvbSUyRnBhZ2VhZCUyRmpzJTJGYWRzYnlnb29nbGUuanMlMjIlM0UlM0MlMkZzY3JpcHQlM0UlMEElM0NpbnMlMjBjbGFzcyUzRCUyMmFkc2J5Z29vZ2xlJTIyJTBBJTIwJTIwJTIwJTIwJTIwc3R5bGUlM0QlMjJkaXNwbGF5JTNBYmxvY2slM0IlMjB0ZXh0LWFsaWduJTNBY2VudGVyJTNCJTIyJTBBJTIwJTIwJTIwJTIwJTIwZGF0YS1hZC1sYXlvdXQlM0QlMjJpbi1hcnRpY2xlJTIyJTBBJTIwJTIwJTIwJTIwJTIwZGF0YS1hZC1mb3JtYXQlM0QlMjJmbHVpZCUyMiUwQSUyMCUyMCUyMCUyMCUyMGRhdGEtYWQtY2xpZW50JTNEJTIyY2EtcHViLTA1MDY1Mzg0MjY0NTY4NzclMjIlMEElMjAlMjAlMjAlMjAlMjBkYXRhLWFkLXNsb3QlM0QlMjIxNjk0OTc1MjIyJTIyJTNFJTNDJTJGaW5zJTNFJTBBJTNDc2NyaXB0JTNFJTBBJTIwJTIwJTIwJTIwJTIwJTI4YWRzYnlnb29nbGUlMjAlM0QlMjB3aW5kb3cuYWRzYnlnb29nbGUlMjAlN0MlN0MlMjAlNUIlNUQlMjkucHVzaCUyOCU3QiU3RCUyOSUzQiUwQSUzQyUyRnNjcmlwdCUzRQ==[/vc_raw_html][/vc_column][/vc_row]

Getting Started

[vc_row][vc_column][/vc_column][/vc_row][vc_row][vc_column width=”1/4″][vc_widget_sidebar sidebar_id=”sidebar_3″ title=”Get Started”][/vc_column][vc_column width=”3/4″][vc_column_text]

Getting Started

We have several guides to help you get started with the WPCargo Track & Trace Plugin.

These guides cover:


Once you’ve finished setting up the system, you can start using it.[/vc_column_text][vc_raw_html]JTNDc2NyaXB0JTIwYXN5bmMlMjBzcmMlM0QlMjIlMkYlMkZwYWdlYWQyLmdvb2dsZXN5bmRpY2F0aW9uLmNvbSUyRnBhZ2VhZCUyRmpzJTJGYWRzYnlnb29nbGUuanMlMjIlM0UlM0MlMkZzY3JpcHQlM0UlMEElM0NpbnMlMjBjbGFzcyUzRCUyMmFkc2J5Z29vZ2xlJTIyJTBBJTIwJTIwJTIwJTIwJTIwc3R5bGUlM0QlMjJkaXNwbGF5JTNBYmxvY2slM0IlMjB0ZXh0LWFsaWduJTNBY2VudGVyJTNCJTIyJTBBJTIwJTIwJTIwJTIwJTIwZGF0YS1hZC1sYXlvdXQlM0QlMjJpbi1hcnRpY2xlJTIyJTBBJTIwJTIwJTIwJTIwJTIwZGF0YS1hZC1mb3JtYXQlM0QlMjJmbHVpZCUyMiUwQSUyMCUyMCUyMCUyMCUyMGRhdGEtYWQtY2xpZW50JTNEJTIyY2EtcHViLTA1MDY1Mzg0MjY0NTY4NzclMjIlMEElMjAlMjAlMjAlMjAlMjBkYXRhLWFkLXNsb3QlM0QlMjIxNjk0OTc1MjIyJTIyJTNFJTNDJTJGaW5zJTNFJTBBJTNDc2NyaXB0JTNFJTBBJTIwJTIwJTIwJTIwJTIwJTI4YWRzYnlnb29nbGUlMjAlM0QlMjB3aW5kb3cuYWRzYnlnb29nbGUlMjAlN0MlN0MlMjAlNUIlNUQlMjkucHVzaCUyOCU3QiU3RCUyOSUzQiUwQSUzQyUyRnNjcmlwdCUzRQ==[/vc_raw_html][/vc_column][/vc_row]

WPCargo Import and Export Documentation

[vc_row][vc_column width=”1/4″][vc_widget_sidebar sidebar_id=”sidebar_3″][/vc_column][vc_column width=”3/4″][vc_column_text]

How to Use Import and Export Add-ons

This is the latest version of WPCargo Import and Export (3.0.8)

Please follow these steps on how to import and export shipments.

First we will export shipment.

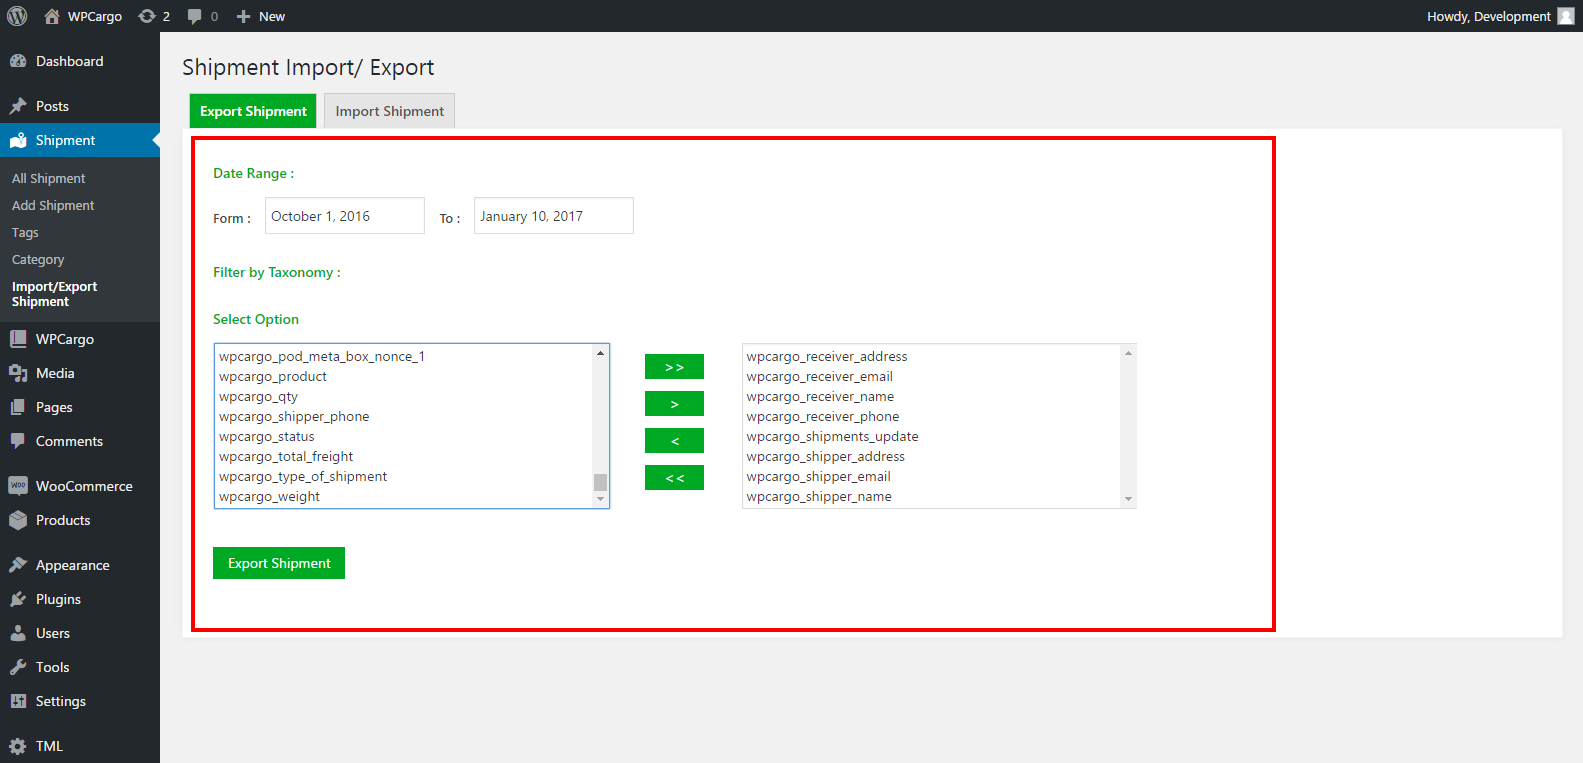
  1. Go to WPCargo>Import/Export Shipment and choose the fields that you want to export
    Date Range – Range of date of shipment that you want to download
    Filter by Taxonomy – 
    Category/ by batch export
    Select Options – the field that you want to export
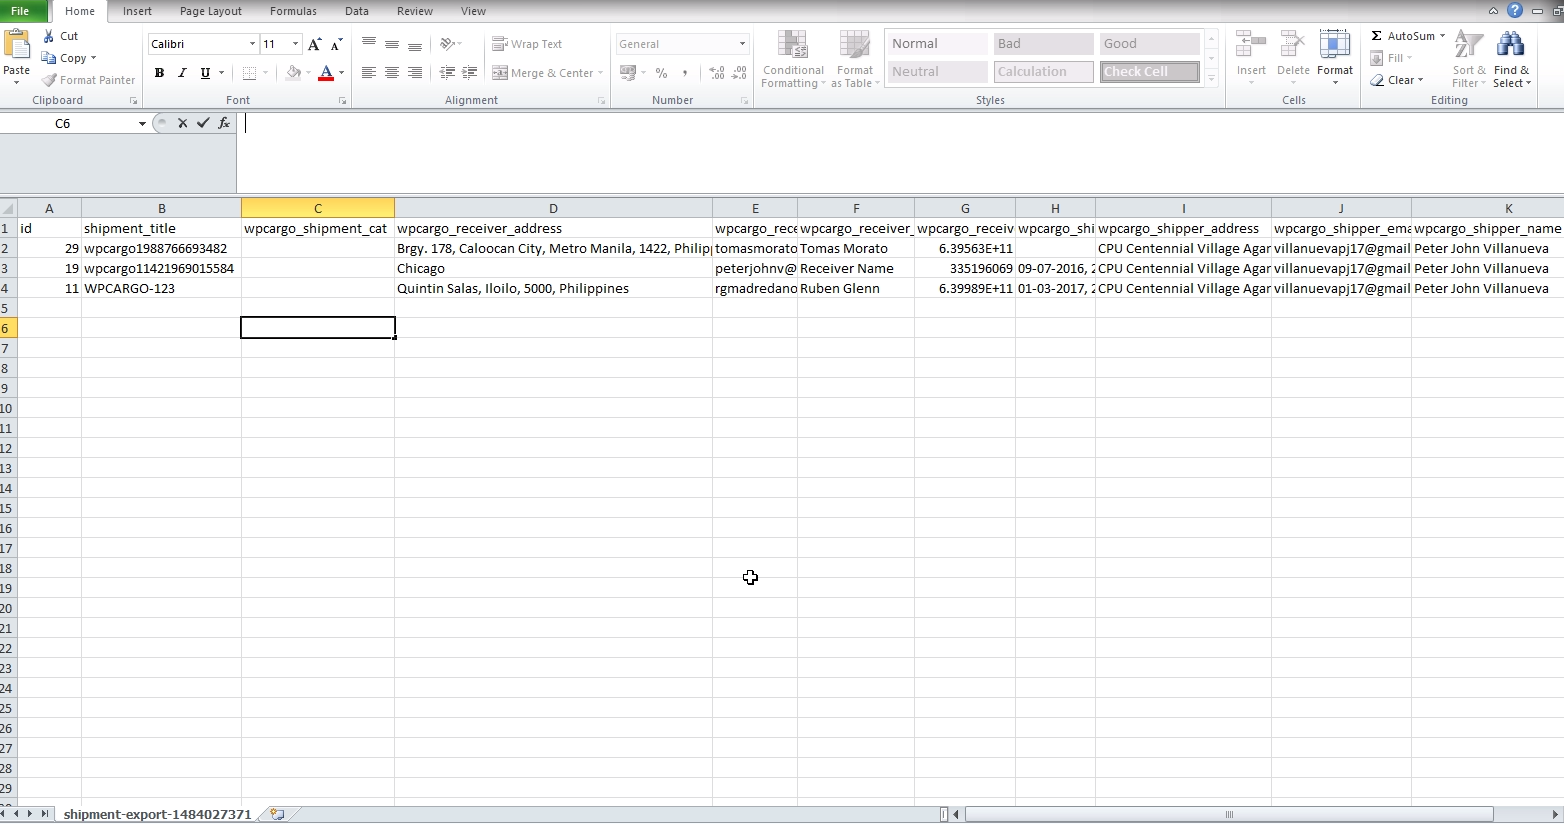
    After you select all the fields, click the Export Shipment button to download the excel file.Sample Shipment that is exported
  2. Now we are ready to import shipments, we can add and also update shipments by importing.
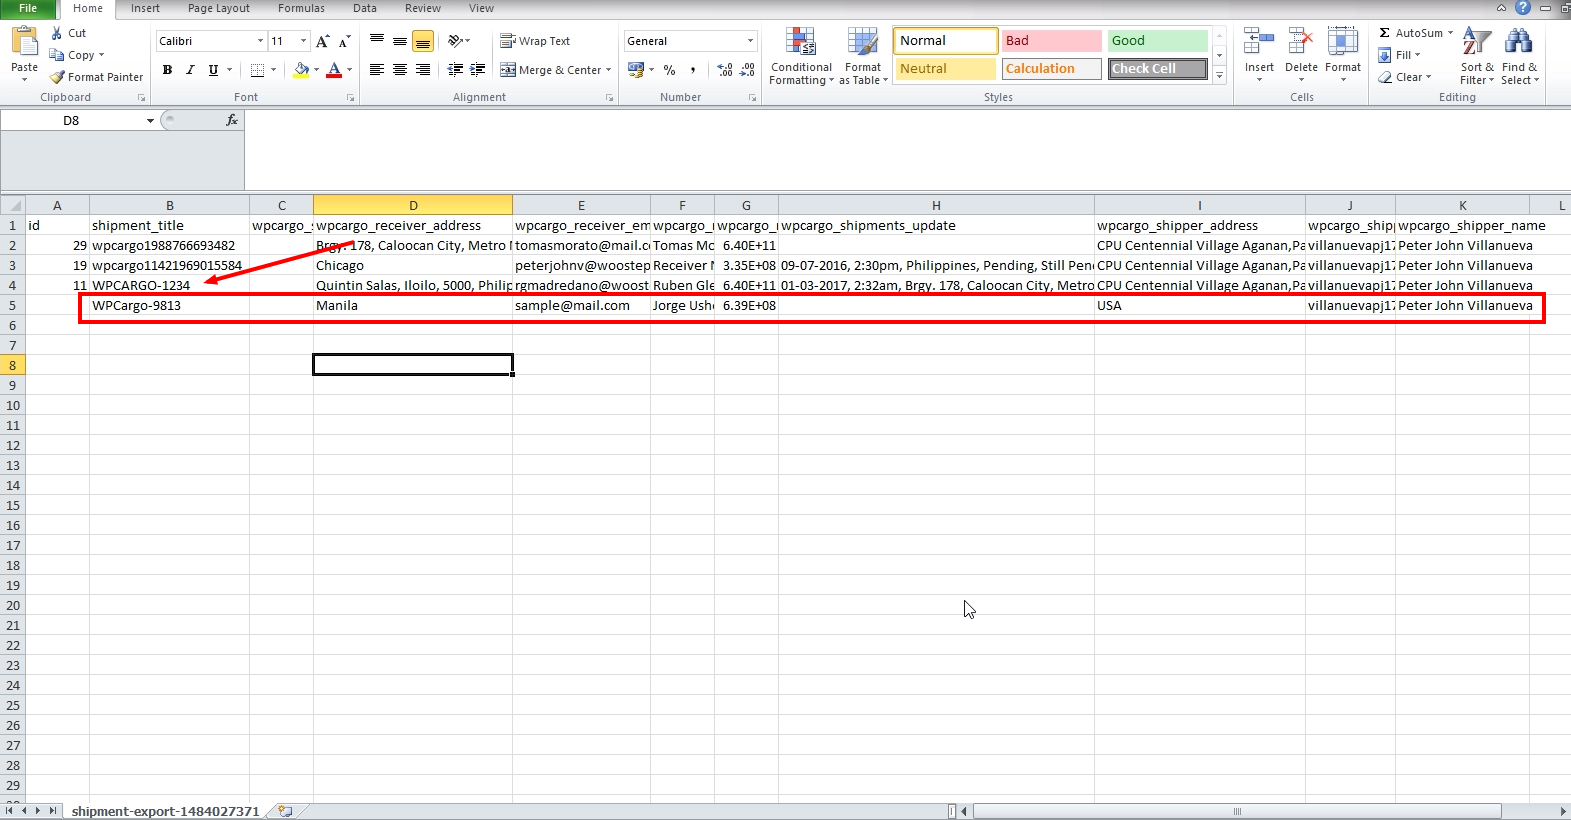
    For Example We will the title of WPCargo-123 to WPCargo-1234 and add another shipment with the tracking number of WPCargo-9813. Please see the example shipments below that will need to be imported to WPCargo.Note that if you are adding a new shipment please make sure that you leave the id column blank
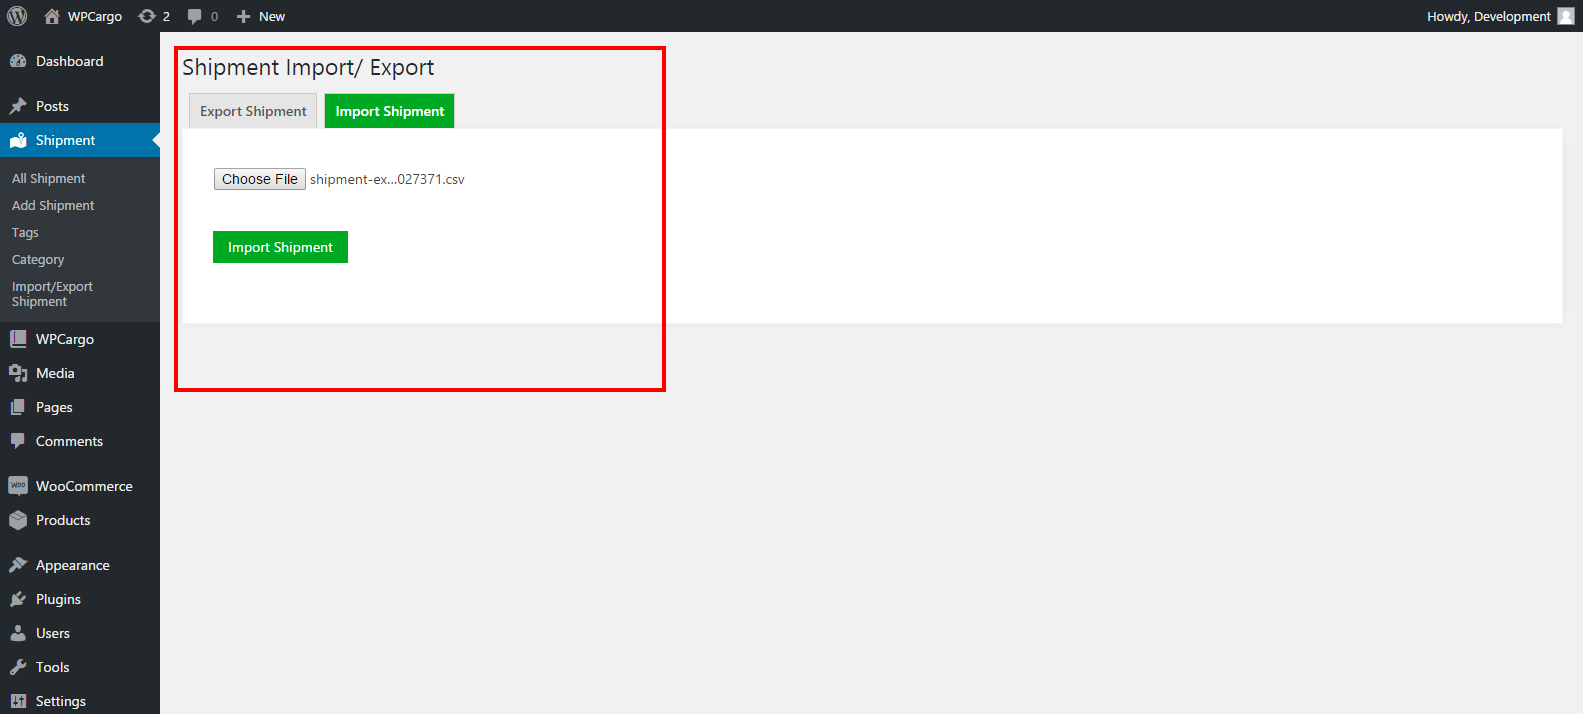
  3. We can now Import shipment, Go to WPCargo>Import/Export Shipment and click Import Shipment Tab upload your csv file

    Click Import Shipment to import all the shipments
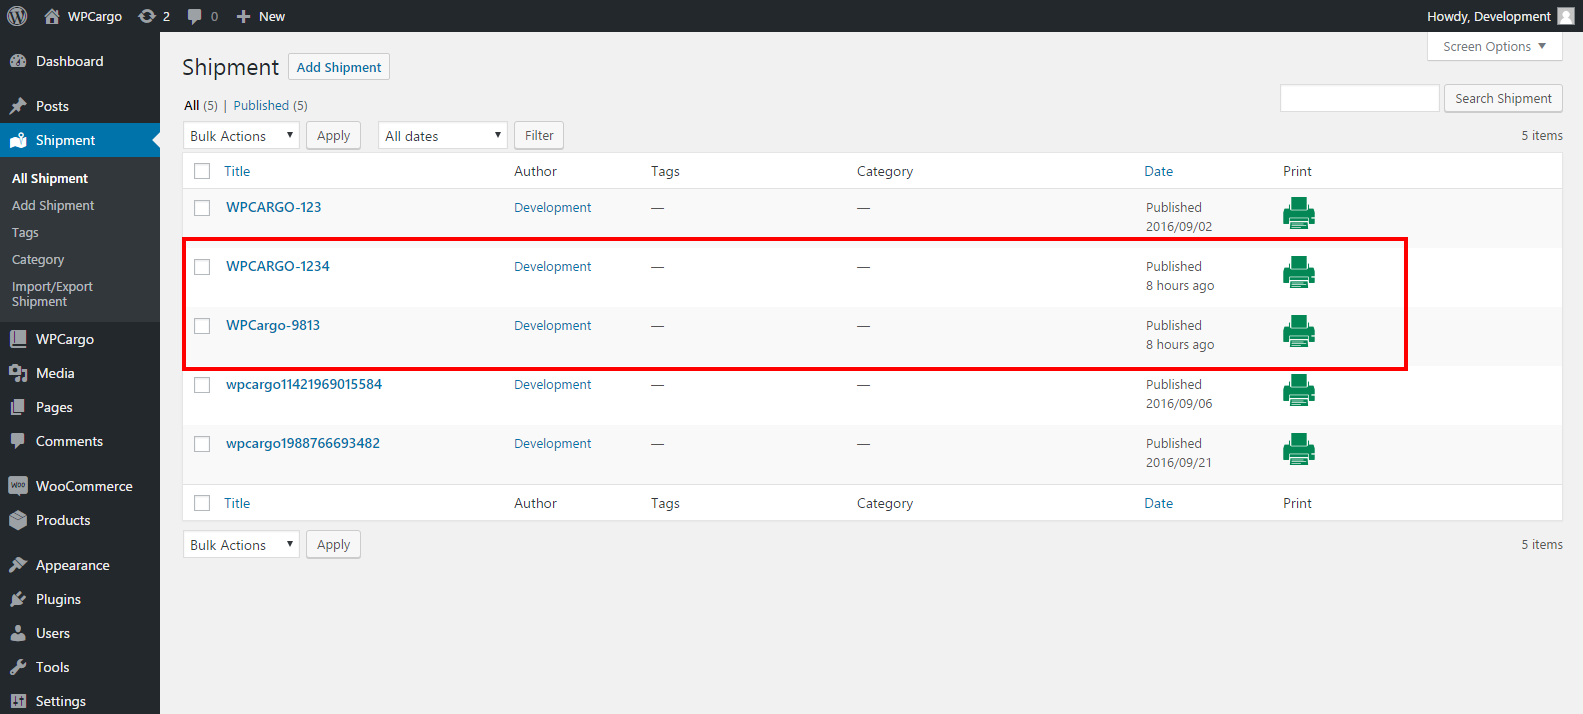
  4. After it successfully imported view your lists of shipments.

[/vc_column_text][/vc_column][/vc_row]

Step by Step Installation of WPCargo and the Add-ons

Please follow these steps on how to setup/install WPCargo and the Add-ons

    1. Install the latest version of WPCargo.
    2. Install the Add-ons that you bought
      WPTaskForce License Helper
      – WPCargo Client Accounts Add-ons
      – WPCargo Courier Add-ons
      – WPCargo Custom Field Add-ons
      – WPCargo Import and Export Add-ons
      – WPCargo Pick-up Management Add-ons
      – WPCargo Shipment History Add-ons
      – WPCargo SMS Add-ons


    1. Activate your License ( It is given to you after you have successfully bought the product )
      Now go to WPCargo>WPTaskforce Helper and add the license on license key field
      Please see this page about activating the plugin.


    1. We can now setup pages for the Tracking Form and the Results
      – Create a Page Where you can add a shortcode for Track Form and Results
      Shortcode

      Enter the Consignment No.

      Ex: 12345

      – This shortcode is for the Track form, the id attribute is the id of the Result Page. And if you want the Track Form and the Results only on the single page just remove the id attribute.

      Enter the Consignment No.

      Ex: 12345

      – This is for the Results Page.


    1. We can now setup the settings of WPCargo
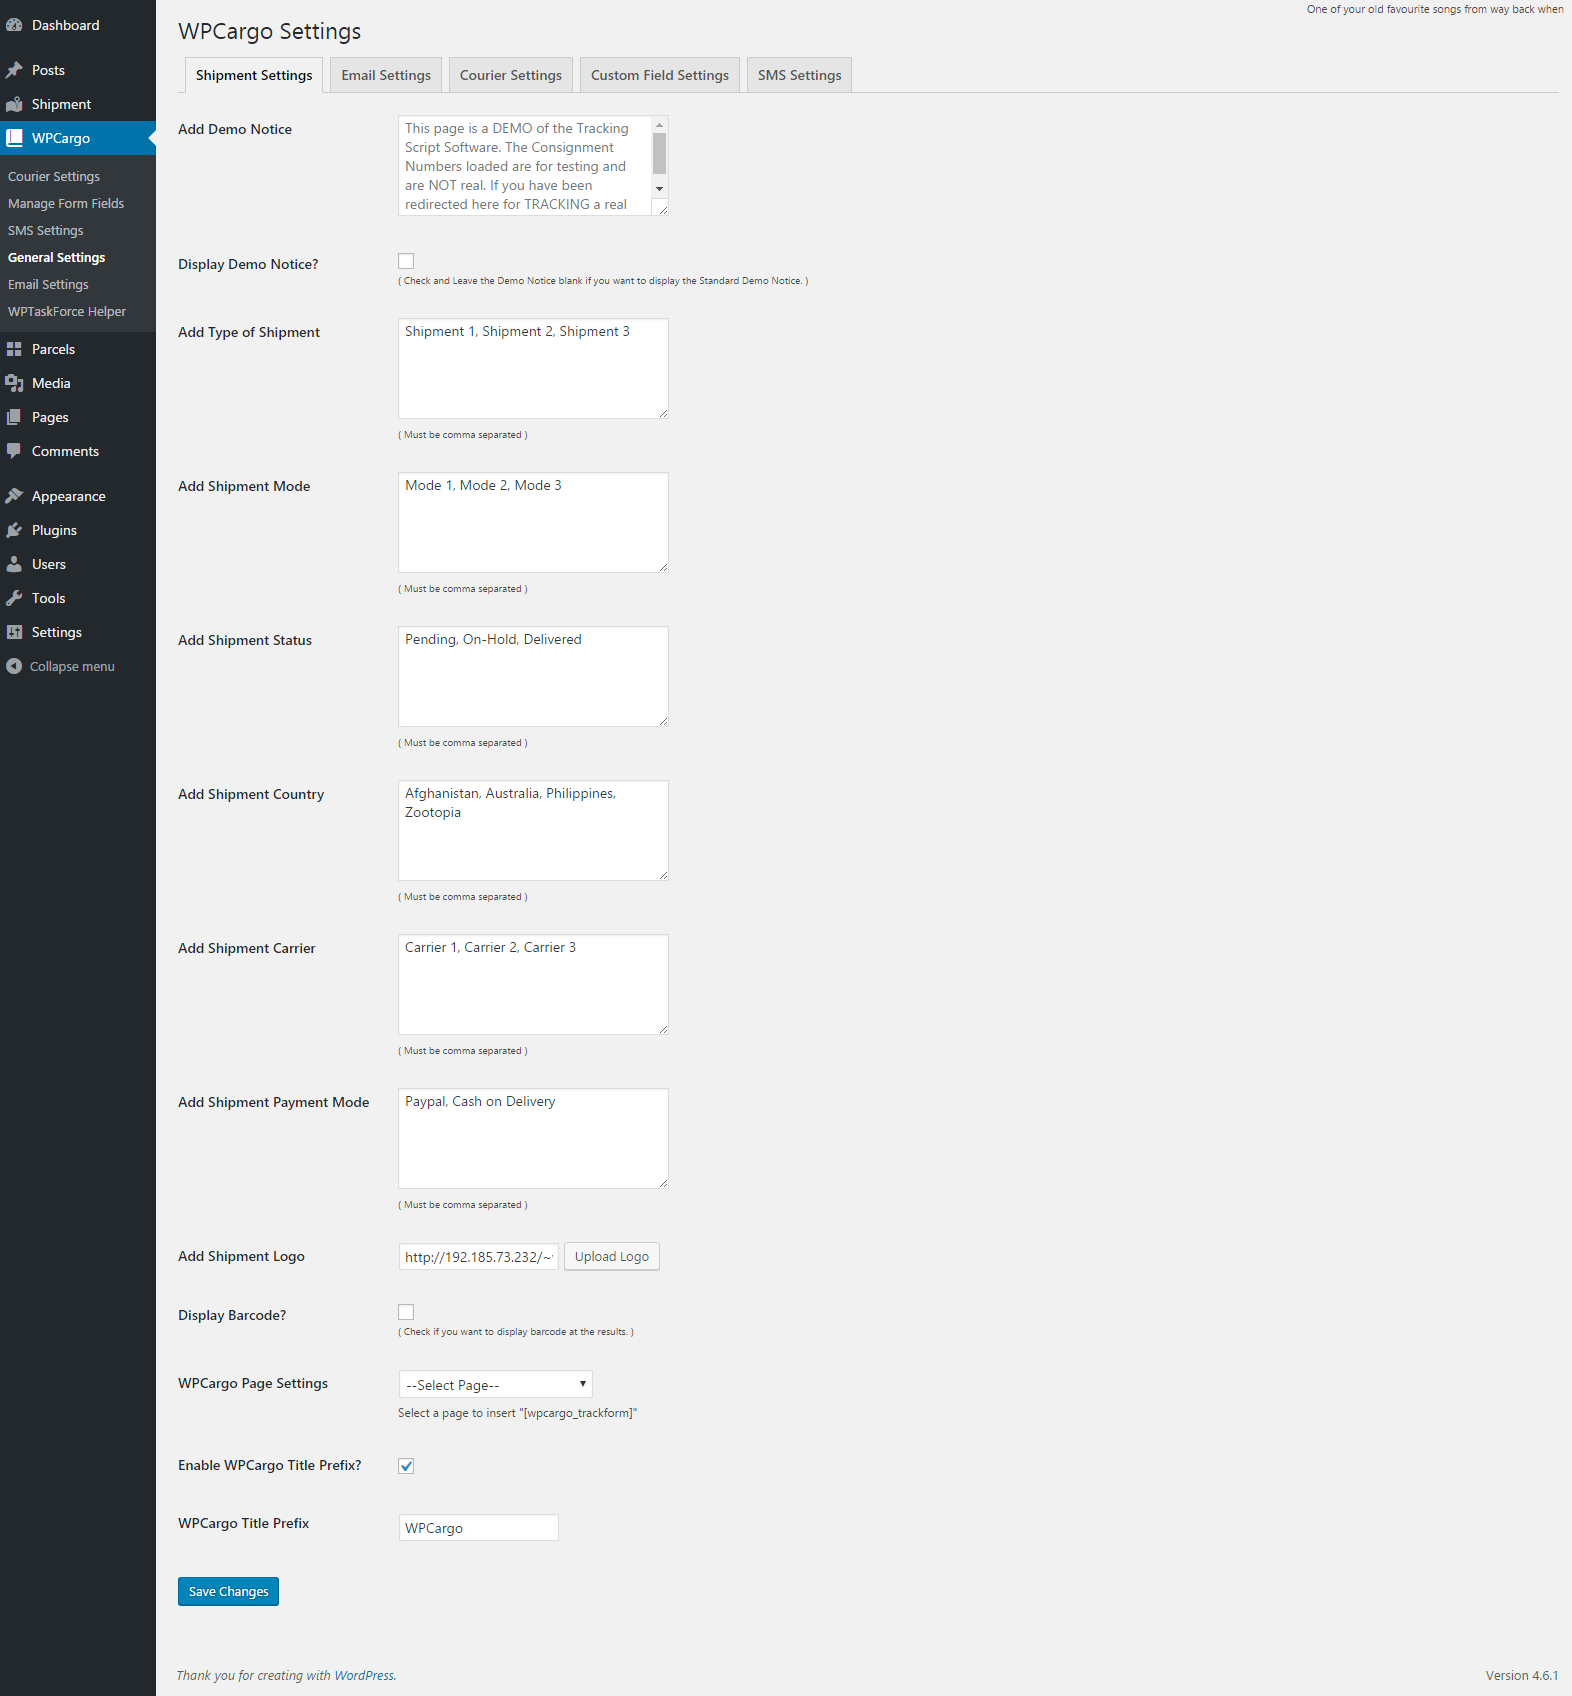
      – Go to WPCargo>General Settings where you can setup the options of the field that have an option, if you install the WPCargo Custom Fields you can edit the options on WPCargo>Manage Form Fields
      – You can Also add the logo on General Settings Page
      – You can also enable the automated Title or Tracking Number on General Settings, it is on Enable WPCargo Title Prefix and the WPCargo Title Prefix
      – You can also activate the automated Email after the shipment status is updated, it is on WPCargo>Email Settingswpcargo-settings


    1. This next step is for those who have WPCargo Client Accounts Add-ons
      Shortcode
      – This is for the lists of Shipment of your WPCargo Client User


CSV Import on WPCargo Import and Export Version 3.0.3

[vc_row][vc_column width=”1/4″][vc_widget_sidebar sidebar_id=”sidebar_3″][/vc_column][vc_column width=”3/4″][vc_column_text]

How to Import using WPCargo Import and Export Version 3.0.3

Please follow these steps on importing shipment history on excel file.

  1. Go to Shipment>Import/Export Shipment then click Import ShipmentImport
  2. Choose a csv file to import

    Notes
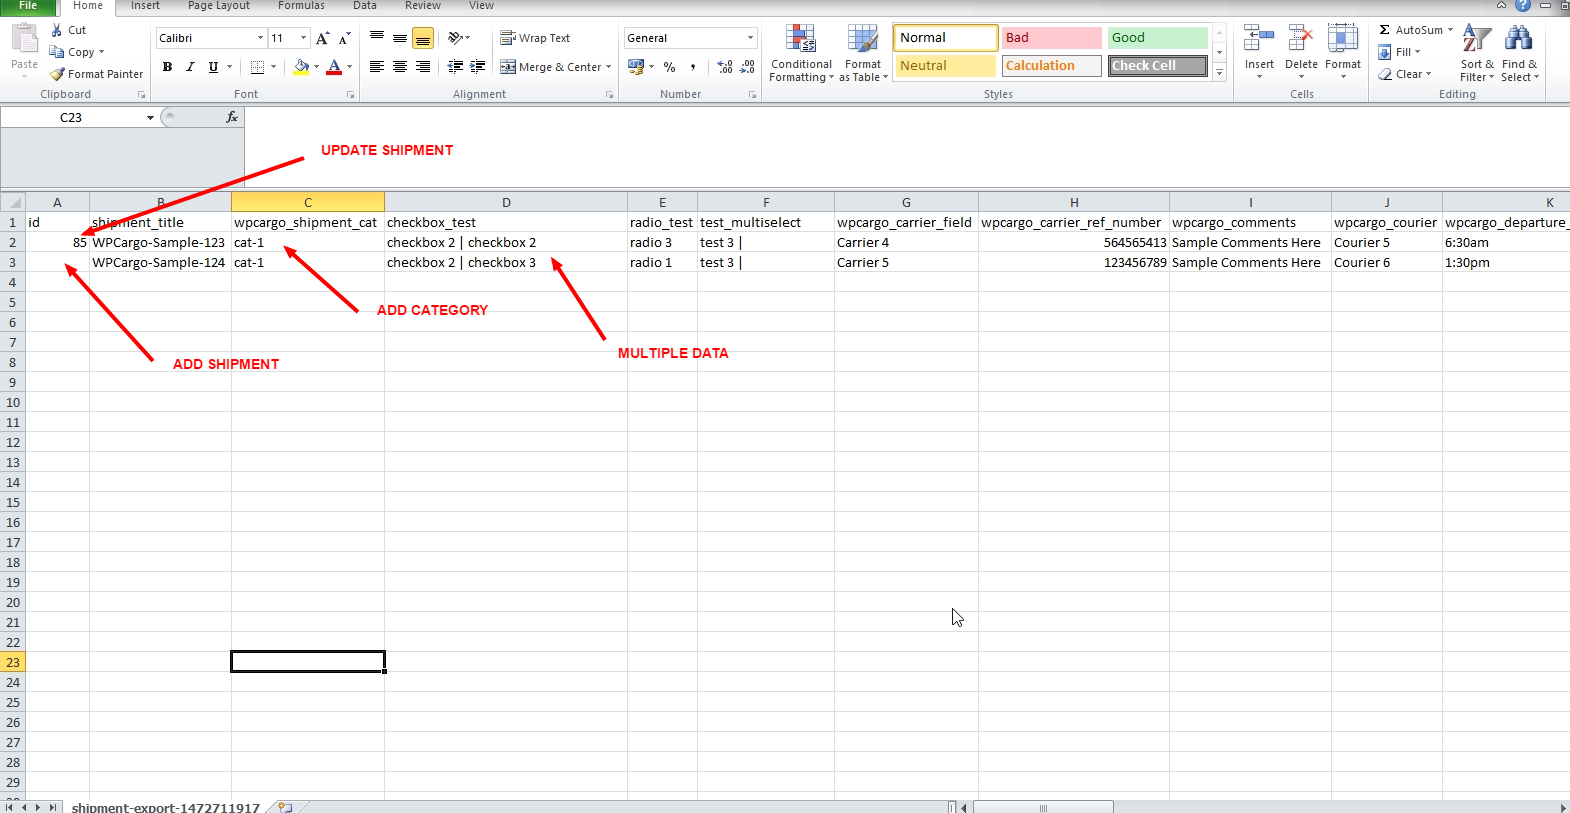
    – If you want to update the Shipment field data make sure your have the id of the shipment
    – If you want to add a shipment LEAVE THE ID FIELD BLANK
    – If you want to update options with multiple selected data use Vertical bar “|” Ex. option 1 | option 2 | option 3
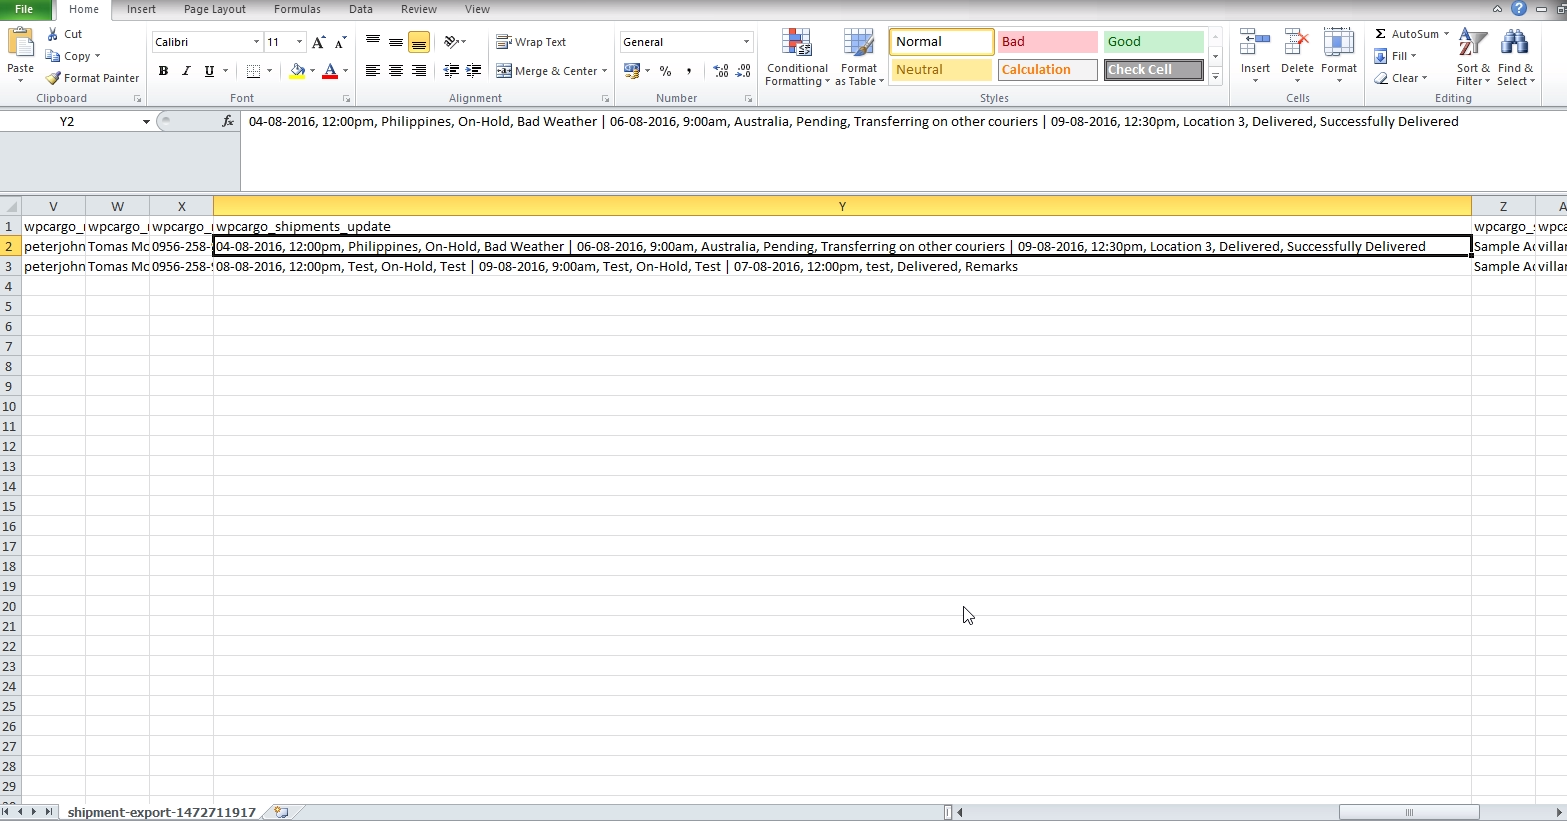
    – For the wpcargo_shipments_update key or shipment history please add the ff. fields with comma separated on each field, the fields must be on “Date”, “Time”, “Location”, “Status”, “Remarks”.
    Ex. 04-08-2016, 12:00pm, Philippines, On-Hold, Bad Weather | 06-08-2016, 9:00am, Australia, Pending, Transferring on other couriers | 09-08-2016, 12:30pm, Location 3, Delivered, Successfully Delivered
    ADD AND UPDATE SHIPMENT
    add-update-shipment
    SHIPMENT HISTORY
    export and import sample

DOWNLOAD SAMPLE CSV[/vc_column_text][vc_raw_html]JTNDc2NyaXB0JTIwYXN5bmMlMjBzcmMlM0QlMjIlMkYlMkZwYWdlYWQyLmdvb2dsZXN5bmRpY2F0aW9uLmNvbSUyRnBhZ2VhZCUyRmpzJTJGYWRzYnlnb29nbGUuanMlMjIlM0UlM0MlMkZzY3JpcHQlM0UlMEElM0NpbnMlMjBjbGFzcyUzRCUyMmFkc2J5Z29vZ2xlJTIyJTBBJTIwJTIwJTIwJTIwJTIwc3R5bGUlM0QlMjJkaXNwbGF5JTNBYmxvY2slM0IlMjB0ZXh0LWFsaWduJTNBY2VudGVyJTNCJTIyJTBBJTIwJTIwJTIwJTIwJTIwZGF0YS1hZC1sYXlvdXQlM0QlMjJpbi1hcnRpY2xlJTIyJTBBJTIwJTIwJTIwJTIwJTIwZGF0YS1hZC1mb3JtYXQlM0QlMjJmbHVpZCUyMiUwQSUyMCUyMCUyMCUyMCUyMGRhdGEtYWQtY2xpZW50JTNEJTIyY2EtcHViLTA1MDY1Mzg0MjY0NTY4NzclMjIlMEElMjAlMjAlMjAlMjAlMjBkYXRhLWFkLXNsb3QlM0QlMjIxNjk0OTc1MjIyJTIyJTNFJTNDJTJGaW5zJTNFJTBBJTNDc2NyaXB0JTNFJTBBJTIwJTIwJTIwJTIwJTIwJTI4YWRzYnlnb29nbGUlMjAlM0QlMjB3aW5kb3cuYWRzYnlnb29nbGUlMjAlN0MlN0MlMjAlNUIlNUQlMjkucHVzaCUyOCU3QiU3RCUyOSUzQiUwQSUzQyUyRnNjcmlwdCUzRQ==[/vc_raw_html][/vc_column][/vc_row]

Pick-up Management Add-ons

[vc_row][vc_column width=”1/4″][vc_widget_sidebar sidebar_id=”sidebar_3″][/vc_column][vc_column width=”3/4″][vc_column_text]Allows you to manage the orders of the client and also for the client to purchase/order online. Note: This needs WPCago and WPCargo Custom Field Add-ons plugin Installed.[/vc_column_text][dt_fancy_title title=”How to Install WPCargo Pick-up Management Add-ons Plugin” title_size=”h4″ title_color=”custom” separator_style=”double” custom_title_color=”#333333″][vc_column_text css=”.vc_custom_1471246622863{margin-top: 35px !important;margin-bottom: 35px !important;}”]

Cpanel Installation.

  1. Purchase the plugin in WPCargo.com
  2. Upload wpcargo-pick-up-management-addons.zip to the /wp-content/plugins/ directory or go to the wordpress site admin plugins page and upload the zip file
  3. Extract the plugin zip file
  4. Go to the site admin plugins page
  5. Activate the plugin

WordPress Admin Installation

  1. Purchase the plugin in WPCargo.com
  2. Go to the admin plugin > Add new
  3. Upload plugin wpcargo-pick-up-management-addons.zip file
  4. Activate the plugin in the plugin list

[/vc_column_text][dt_fancy_title title=”How to Activate WPCargo Pick-up Management Add-ons License” title_size=”h4″ title_color=”custom” separator_style=”double” custom_title_color=”#333333″][vc_column_text css=”.vc_custom_1471246873632{margin-top: 35px !important;margin-bottom: 35px !important;}”]

  1. Go to the Site admin dashboard
  2. Visit WPcargo > WPTaskforce
  3. Add the license in the “License Key” column
  4. Tick the “Activate” button to activate

[/vc_column_text][vc_single_image image=”1975″ img_size=”large” alignment=”center” style=”vc_box_rounded” onclick=”link_image” lazy_loading=”true”][dt_fancy_title title=”How to use WPCargo Pick-up Management Add-ons” title_align=”left” title_size=”h4″ title_color=”custom” separator_style=”double” custom_title_color=”#333333″][vc_column_text css=”.vc_custom_1471249633246{margin-top: 35px !important;margin-bottom: 35px !important;}”]Before using the WPCargo Pick-up management add-ons, you need to create custom fields for your pick-up management fields.[/vc_column_text][dt_fancy_title title=”How to Create Custom Field for Pick-up Management” title_size=”h4″ title_color=”custom” custom_title_color=”#333333″][vc_column_text css=”.vc_custom_1471249121955{margin-top: 35px !important;margin-bottom: 35px !important;}”]Note: This needs WPCargo Custom Field add-ons to be activated.

  1. Go to the Admin menu WPCargo > Manage Form Fields (See figure 2.1)
  2. Click “Add form field” tab to add New Form Field
  3. Fill-up all the fields requirement for the form field. (See figure 2.2)
    • Field Type – Type of input field.
    • Field Label – Label on the input field.
    • Field Description – Description of the input field.
    • Field Options for select lists, radio buttons and checkboxes – This are the option of the input field (Note: This will be fillable when the selected Field Type is select, multiselect, radio, checkbox, Each selection must be sepated with comma (,) ).
    • Field meta key – Name of the input field and this will be the name of the post meta key
    • Is Field required? – Add “required” attribute to the input field.
    • What Section do you want to display? – Assign the input field which section to be added
    • Do you want to display on search form? – Select if you want the field to be added in the “Track Form”
    • Is field required on search form? – Add “required” attribute to the form field in the “Track Form”
    • Do you want to display it on result page? – Select if you want the field to be display in the “Track Form” result
    • Do you want to display it on pick-up management page? – Select if the form field want to add in the “Pick-up Management” form field.
  1. Click “Add Field”

[/vc_column_text][vc_row_inner][vc_column_inner width=”1/2″][vc_single_image image=”1978″ img_size=”full” add_caption=”yes” alignment=”center” style=”vc_box_rounded” onclick=”link_image” title=”Figure 2.1″ lazy_loading=”true”][/vc_column_inner][vc_column_inner width=”1/2″][vc_single_image image=”1979″ img_size=”full” add_caption=”yes” alignment=”center” style=”vc_box_rounded” onclick=”link_image” title=”Figure 2.2″ lazy_loading=”true”][/vc_column_inner][/vc_row_inner][vc_column_text css=”.vc_custom_1471248170668{margin-top: 35px !important;margin-bottom: 35px !important;}”]How to “Edit” the create form Field

  1. Go to the Admin menu WPCargo > Manage Form Fields
  2. Click “Add form field” tab to add Form Field List
  3. Hover on the Field label and click the “Edit” hyper link
  4. Edit the Field form that you want to edit
  5. Click the “Edit Field” button to save the changes

How to “Delete” the create form field

  1. Go to the Admin menu WPCargo > Manage Form Fields
  2. Click “Add form field” tab to add Form Field List
  3. Hover on the Field label and click the “Delete” hyper link

[/vc_column_text][dt_fancy_title title=”How to use plugin Shortcode” title_size=”h4″ title_color=”custom” custom_title_color=”#333333″][vc_column_text css=”.vc_custom_1471248306389{margin-top: 35px !important;margin-bottom: 35px !important;}”]

  1. Create a new page for your Pick-up Management Page
  2. Add [wpcargo-pick-up-management] shortcode for the content.

[/vc_column_text][dt_fancy_title title=”How to Set-up Plugin Parcel” title_size=”h4″ title_color=”custom” custom_title_color=”#333333″][vc_column_text css=”.vc_custom_1471248406908{margin-top: 35px !important;margin-bottom: 35px !important;}”]

  1. Go to the Admin menu Parcels > Add New
  2. Fill-up all the fields for the parcel information
  3. Click Publish to save parcel

[/vc_column_text][dt_fancy_title title=”How to Set-up Parcel Price Currency and Title Prefix” title_size=”h4″ title_color=”custom” separator_style=”double” custom_title_color=”#333333″][vc_column_text css=”.vc_custom_1471249150354{margin-top: 35px !important;margin-bottom: 35px !important;}”]

  1. Go to the Admin menu > Parcel > Pick-up Management Settings
  2. Fill-up all field based on you requirement (See Figure 3.1)
    • Currency – Select currency symbol for the Parcel amount
    • WPCargo Title Prefix – Title prefix for the Pick-up Management Form submission
  3. Click “Save Settings” button to save

[/vc_column_text][vc_single_image image=”1981″ img_size=”full” add_caption=”yes” alignment=”center” onclick=”link_image” title=”Figure 3.1″ lazy_loading=”true”][dt_fancy_title title=”How to View Pick-up Management Information” title_size=”h4″ title_color=”custom” separator_style=”double” custom_title_color=”#333333″][vc_column_text css=”.vc_custom_1471249164168{margin-top: 35px !important;margin-bottom: 35px !important;}”]

  1. Go to the Admin menu > Parcel > Parcel Orders
  2. Click the “Parcel order” you want to view (See Figure 4.1)
  3. Click the “Print Receipt” at the left side of the page to print the parcel order Information

[/vc_column_text][vc_single_image image=”1983″ img_size=”full” add_caption=”yes” alignment=”center” style=”vc_box_rounded” onclick=”link_image” title=”Figure 4.1″ lazy_loading=”true”][/vc_column][/vc_row]

We have released the latest version of WPCargo Version 3.0.0

To all our valued customers we have released our latest version of WPCargo, for those who bought WPCargo Add-ons please get in touch with support.

FOR THOSE WHO HAVE OLD VERSIONS OF WPCARGO CUSTOM FIELDS, BEFORE UPDATING THE PLUGIN TO 3.0.0 PLEASE FOLLOW THESE STEPS

The fields that you created will be deleted please create a backup.

  1. Backup {prefix}wpcargo_custom_fields table
  2. Drop or Delete {prefix}wpcargo_custom_fields table
  3. Install the latest version of WPCargo
  4. Install WPTaskForce Helper
  5. Install the Latest Version of WPCargo Add-ons 3.0.0

Added on our Latest Version

  • Added Developer Hooks
  • Fix jQuery Bugs
  • Add Template Folder
  • Add Language Folder
  • Add Localization
  • Enhance Script
  • Update Styles
  • Create Separate Settings
  • Add Title Prefix Settings
  • Organize Scripts and Directories
  • Add Print on result page
  • Add Email Notification when updating shipments


If you have more questions about our new updates or if you seen a bugs please contact us!

Thanks!
WPCargo Team


WPCargo v2.0.1 Released

You can now update your plugin to WPCargo v2.0.1. It can be update using in your plugin pages in your WordPress dashboard or download it here and update it manually.

In this released, we updated the user-friendliness of the dashboard specially in adding your shipment details, automatic generate unique tracking numbers, fix bug in notice, fix jquery bugs and add more settings.

We are working hard to improve our products. In the next release we are still working on the features that supports big courier company like DHL, Fedex, UPS,USPS and many more.

For more features , please visits our request a features pages and fill up the form for the features you like to add in WPCargo. Thank you in advance for your support.