WPCargo Goes Multilingual

You can download the WPCargo with multilanguage support in here. If you have an existing  plugin installed, just remove the WPCargo plugin and  reinstall it or update in your plugin page.

To add your own language in WPCargo.

  1.  Edit  “wpcargo.po” language and add your translation  using a program called POEdit, which is totally free.
  2.  Save or compile it  with the filename {domain}-{language_code}_{country_code}.po . Here is complete list of Languages Codes and Country Codes.
    • Ex. wpcargo-hi_IN.po
  3. Upload it to /wp-content/plugins/wpcargo/languages/
    • See to it you uploaded the wpcargo-hi_IN.po and wpcargo-hi_IN.mo
  4. Open wp-config.php, change define(‘WPLANG’,”) to define(‘WPLANG’,’hi_IN’)
  5. Refresh your wordpress page and you should see wordpress options in hindi language.

Please support and  help us in  translating WPCargo in your language click here.

https://translate.wordpress.org/projects/wp-plugins/wpcargo/dev


WPCargo Pick-up Management V2.0.0 beta Released

WPCargo Pick-up Management in now available, this plugin is design for online pickup shipment with unlimited parcel offers and world wide currency symbols.

User define Shipment title prefix and email notification for the Site administrator, Shipper and Receiver account. To try this plugin here.


How to add a list registered clients dropdown custom field

[vc_row][vc_column width=”1/3″][vc_widget_sidebar sidebar_id=”sidebar_3″][/vc_column][vc_column width=”2/3″][vc_column_text]

How to add a list registered clients dropdown custom field

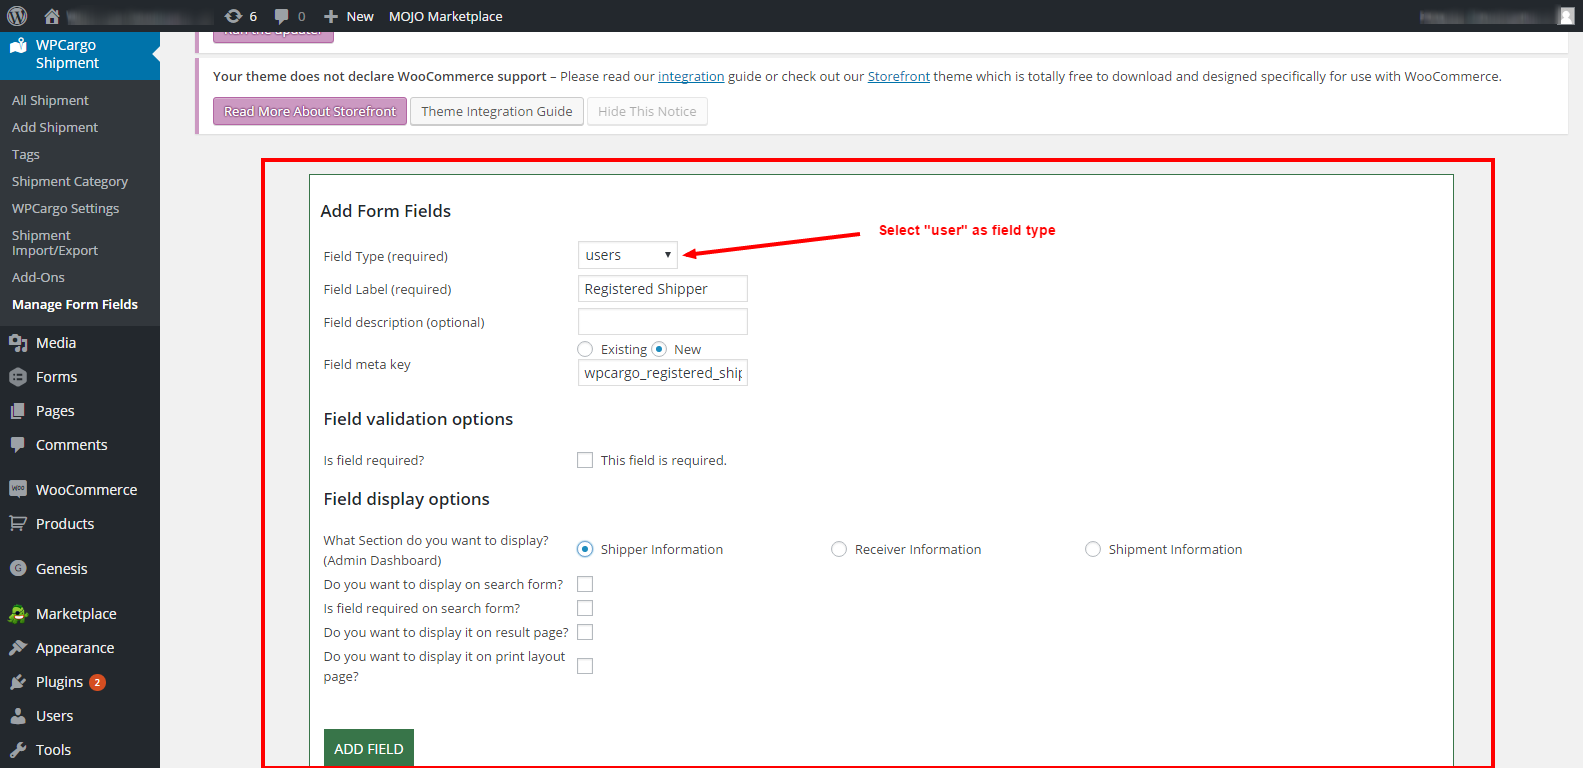
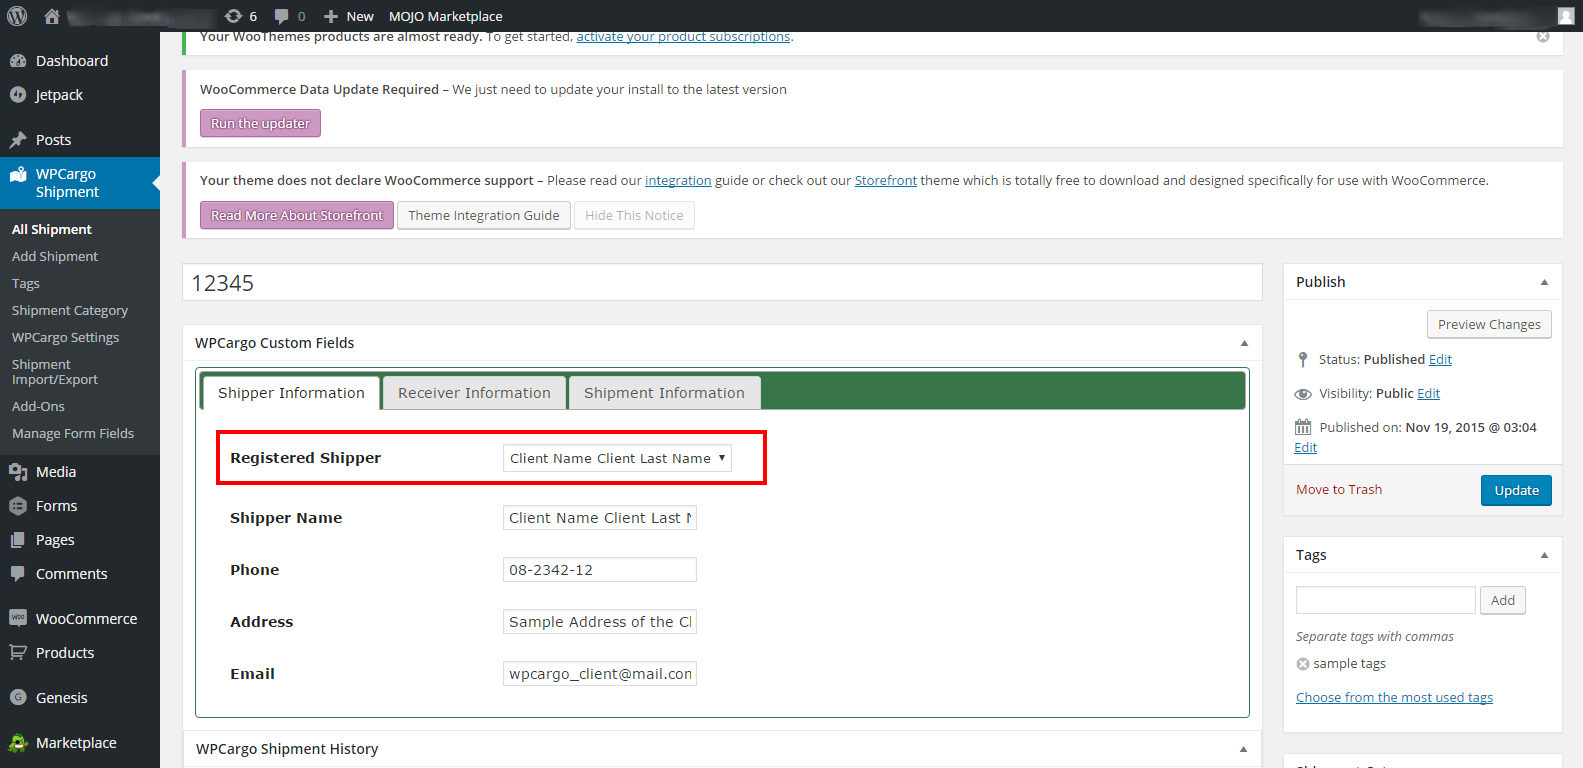
  1. Go to your admin dashboard > WPCargo Shipment > Manage Form Fields > Add New Form Field then fill up the form.
    Choose users as field type.
    You can choose where to display the Registered Client, whether in Shipper Information or Receiver Information.User
  2. After filling out the form click the “ADD FIELD” button then we can now view it on all shipment.
    Role

NOTE

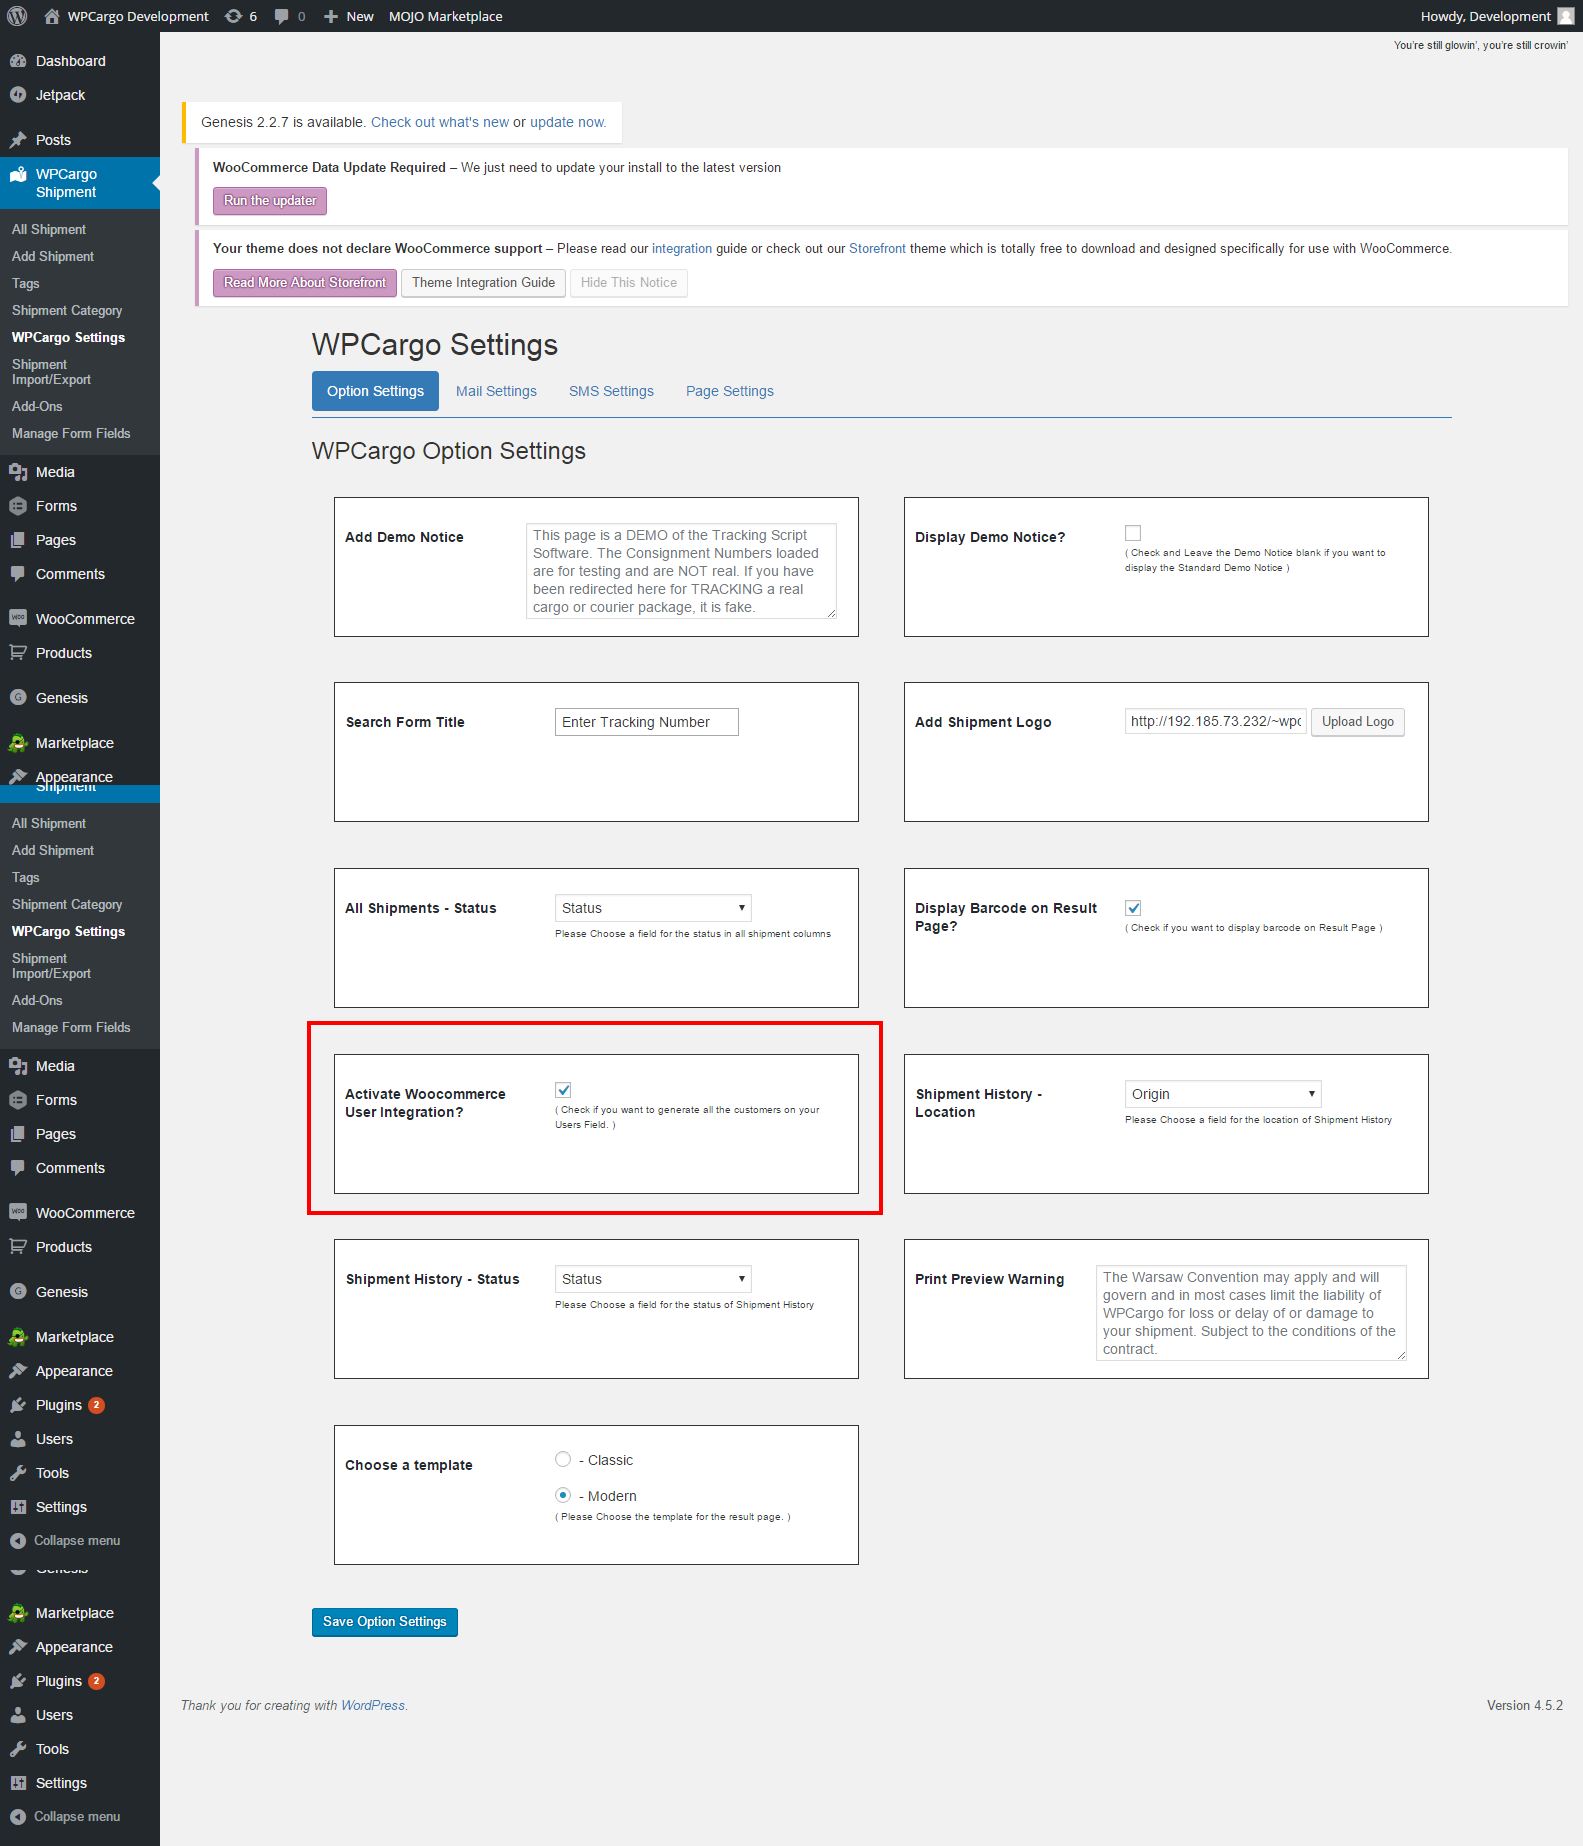
  • The user must be Registered as a WPCargo Client or a Customer on Woocommerce Plugin
  • For the Registered Customer on Woocommerce, please set up it on the WPCargo SettingsSettings ‹ WPCargo Development — WordPress

[/vc_column_text][vc_raw_html]JTNDc2NyaXB0JTIwYXN5bmMlMjBzcmMlM0QlMjIlMkYlMkZwYWdlYWQyLmdvb2dsZXN5bmRpY2F0aW9uLmNvbSUyRnBhZ2VhZCUyRmpzJTJGYWRzYnlnb29nbGUuanMlMjIlM0UlM0MlMkZzY3JpcHQlM0UlMEElM0NpbnMlMjBjbGFzcyUzRCUyMmFkc2J5Z29vZ2xlJTIyJTBBJTIwJTIwJTIwJTIwJTIwc3R5bGUlM0QlMjJkaXNwbGF5JTNBYmxvY2slM0IlMjB0ZXh0LWFsaWduJTNBY2VudGVyJTNCJTIyJTBBJTIwJTIwJTIwJTIwJTIwZGF0YS1hZC1sYXlvdXQlM0QlMjJpbi1hcnRpY2xlJTIyJTBBJTIwJTIwJTIwJTIwJTIwZGF0YS1hZC1mb3JtYXQlM0QlMjJmbHVpZCUyMiUwQSUyMCUyMCUyMCUyMCUyMGRhdGEtYWQtY2xpZW50JTNEJTIyY2EtcHViLTA1MDY1Mzg0MjY0NTY4NzclMjIlMEElMjAlMjAlMjAlMjAlMjBkYXRhLWFkLXNsb3QlM0QlMjIxNjk0OTc1MjIyJTIyJTNFJTNDJTJGaW5zJTNFJTBBJTNDc2NyaXB0JTNFJTBBJTIwJTIwJTIwJTIwJTIwJTI4YWRzYnlnb29nbGUlMjAlM0QlMjB3aW5kb3cuYWRzYnlnb29nbGUlMjAlN0MlN0MlMjAlNUIlNUQlMjkucHVzaCUyOCU3QiU3RCUyOSUzQiUwQSUzQyUyRnNjcmlwdCUzRQ==[/vc_raw_html][/vc_column][/vc_row]

How to Set up WPCargo

Please follow these steps on how to setup WPCargo.

  1. You need to login as admin on your WordPress Site.
  2. Install WPCargo on your plugins – https://wordpress.org/plugins/wpcargo/
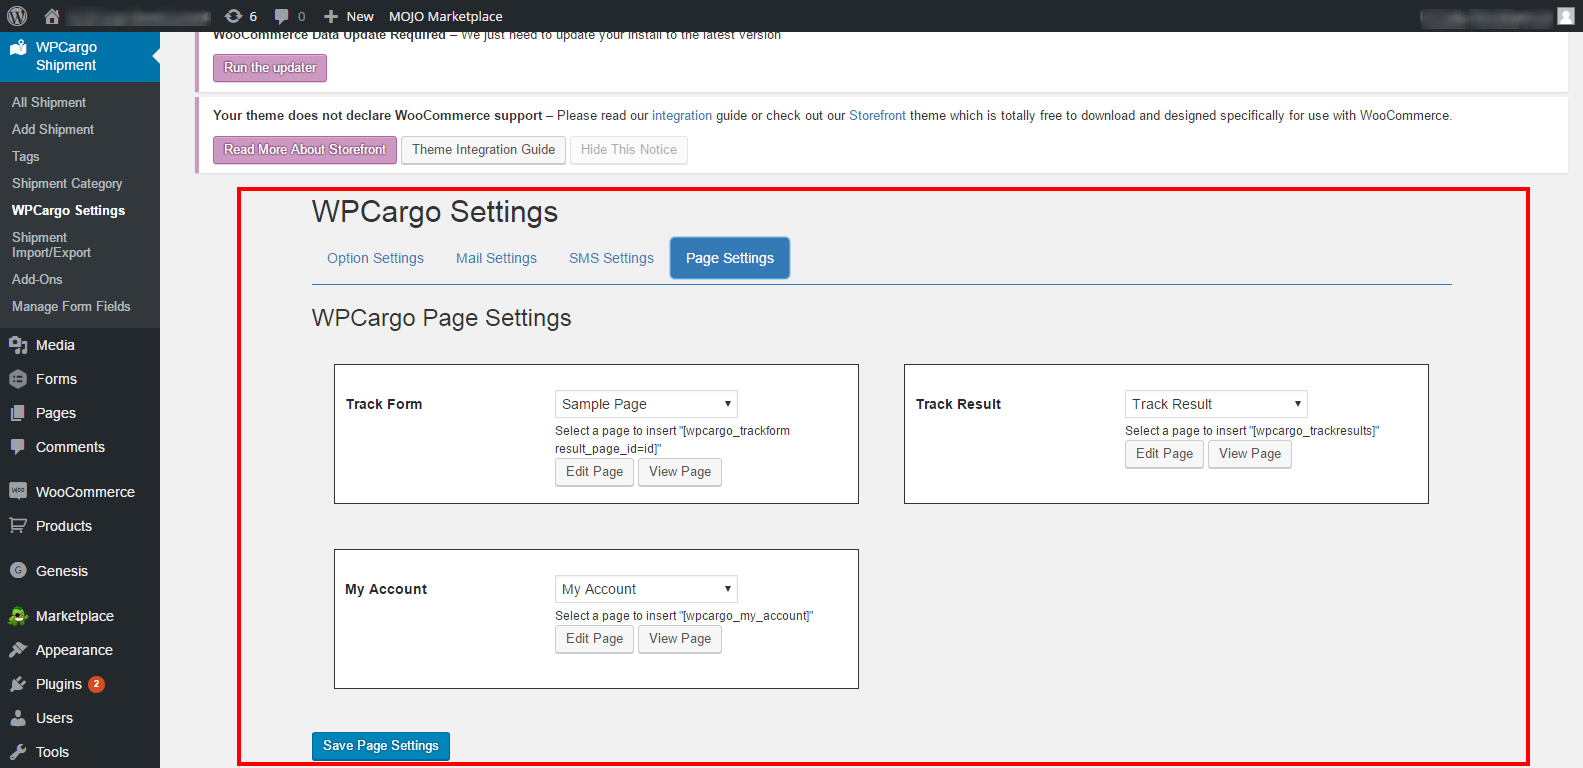
  3. After you install WPCargo, you can now setup the pages on your WPCargo Settings>Page Settings then choose the pages that you want to display the Tracking Form and Result Page.

    Settings ‹ WPCargo Development — WordPress

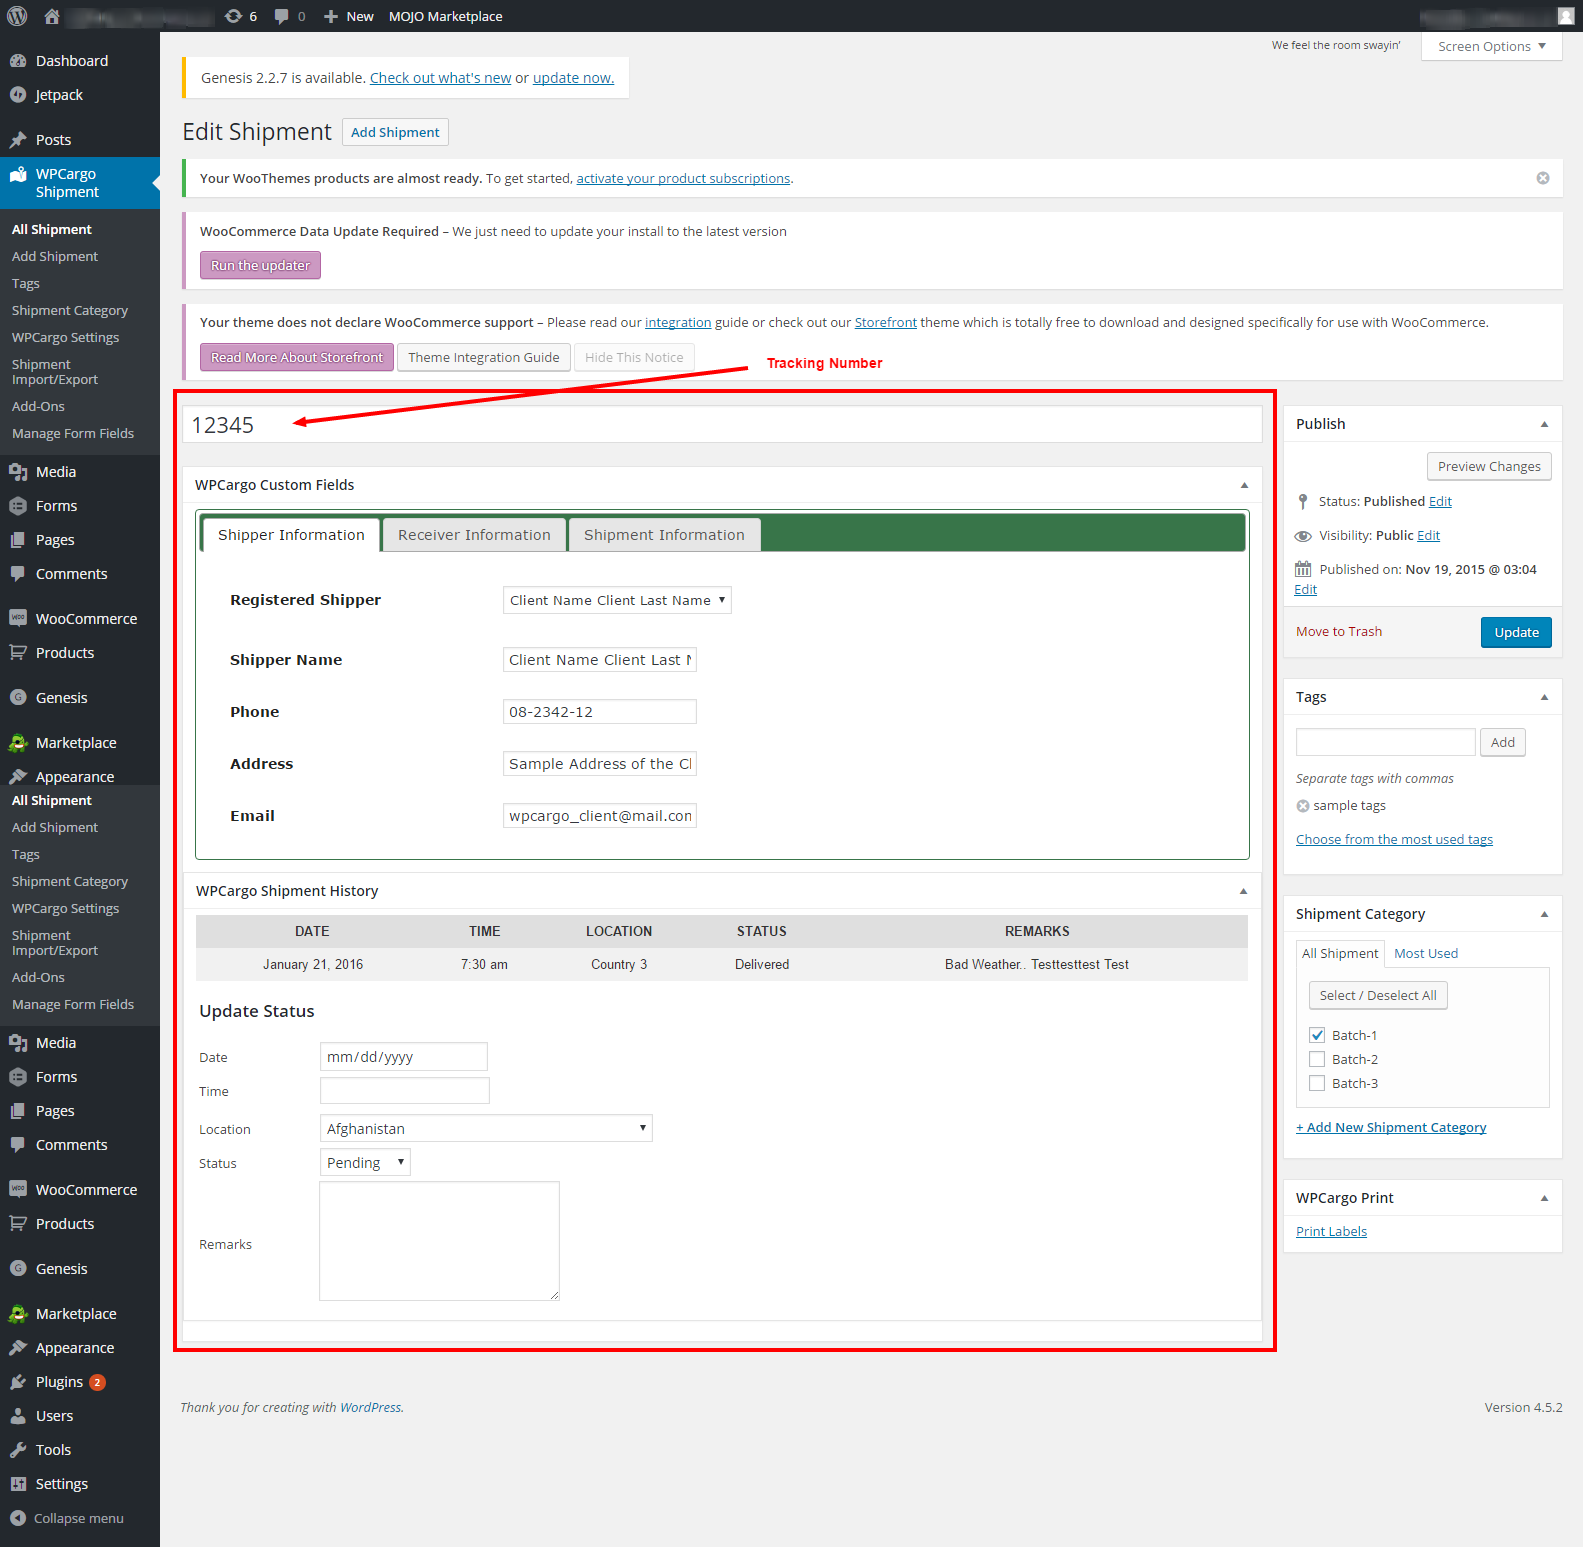
  4. We can now create a new Shipment, on WPCargo Shipment>Add Shipment.
  5. Fill up all the details that you want for the shipment after you fill up all the form click publish.

    Info Shipment

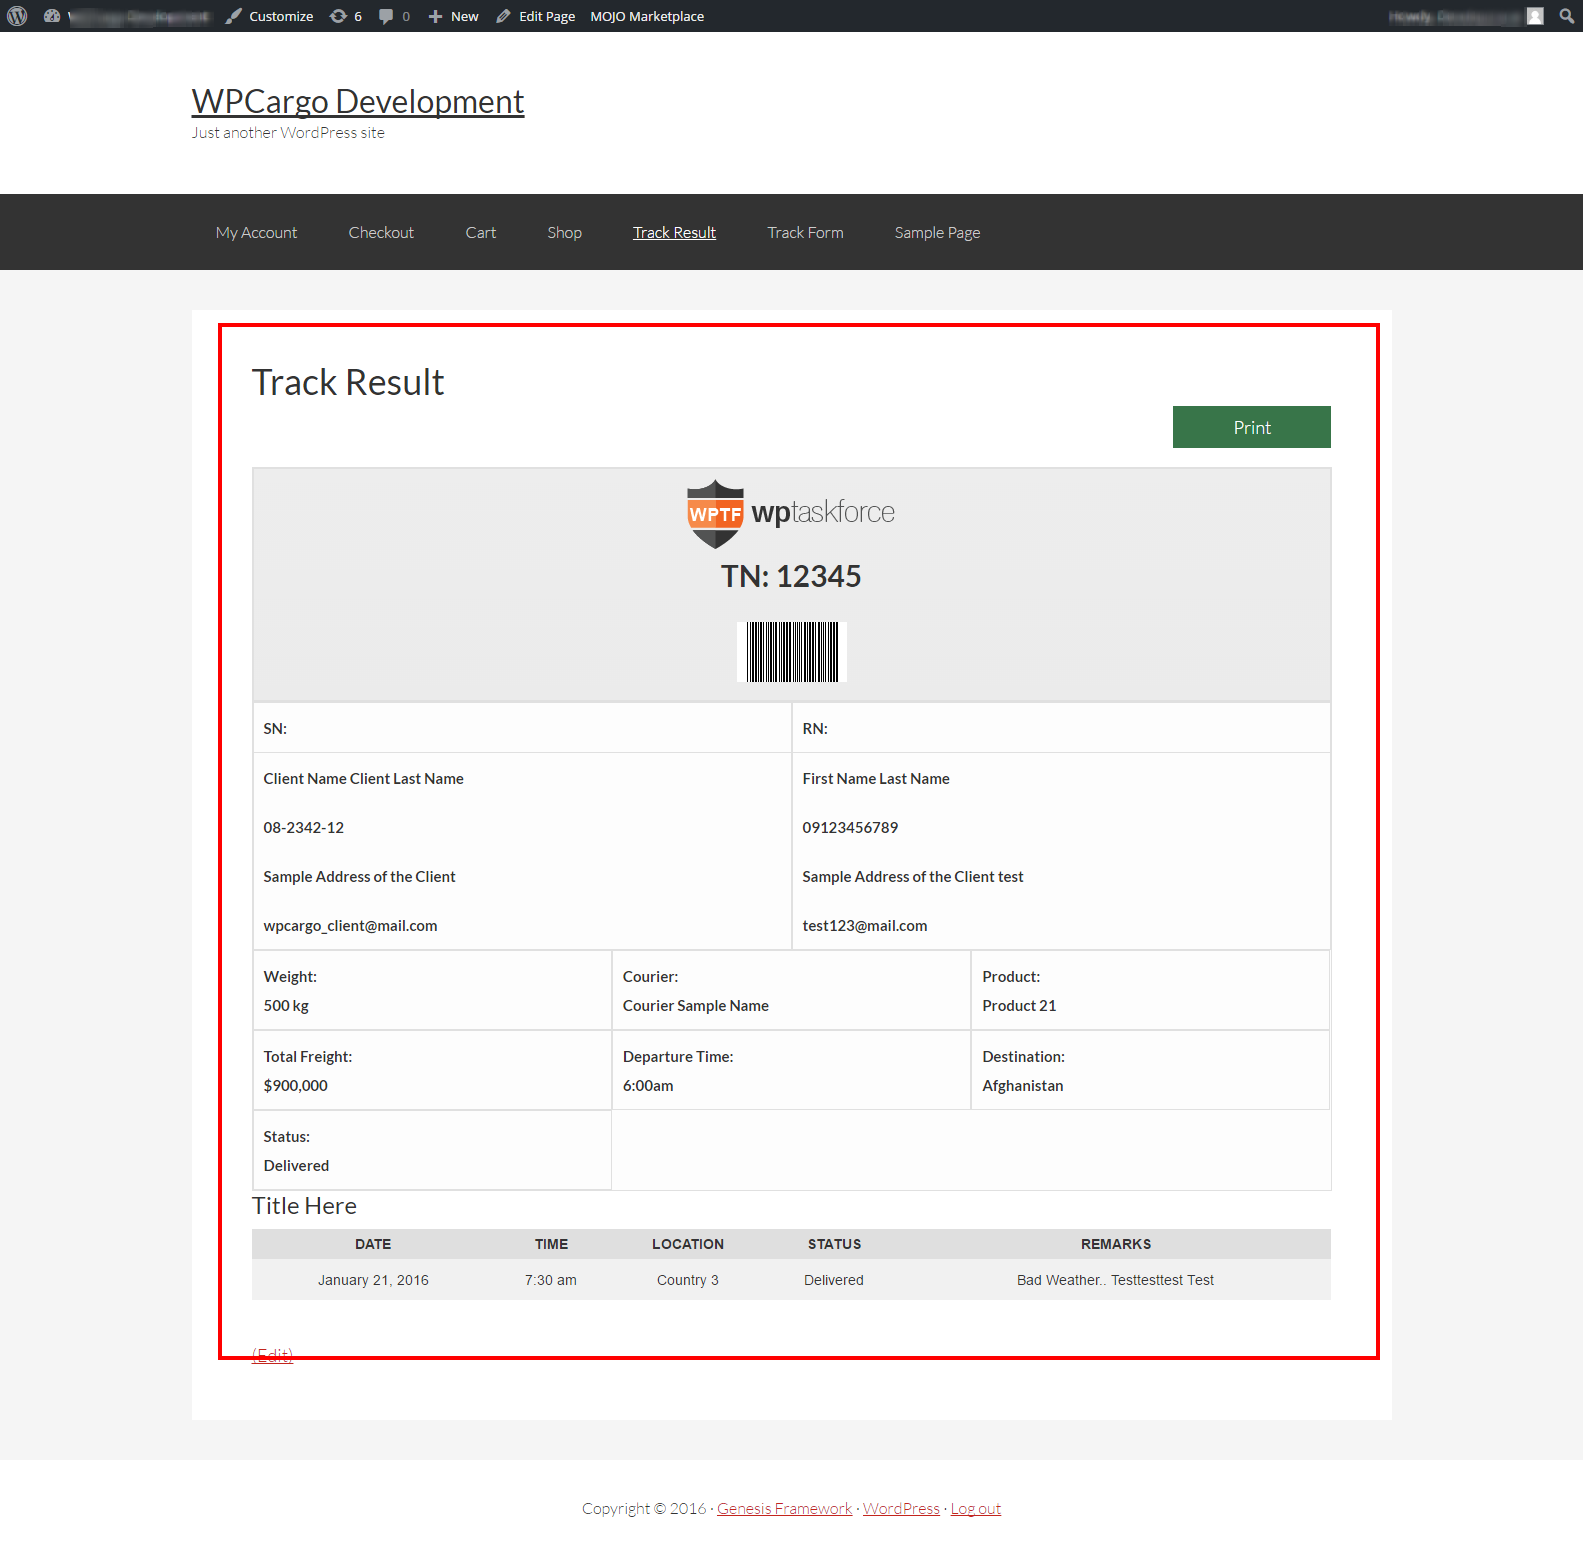
  6. We are now ready to view the shipment at the Front-end.
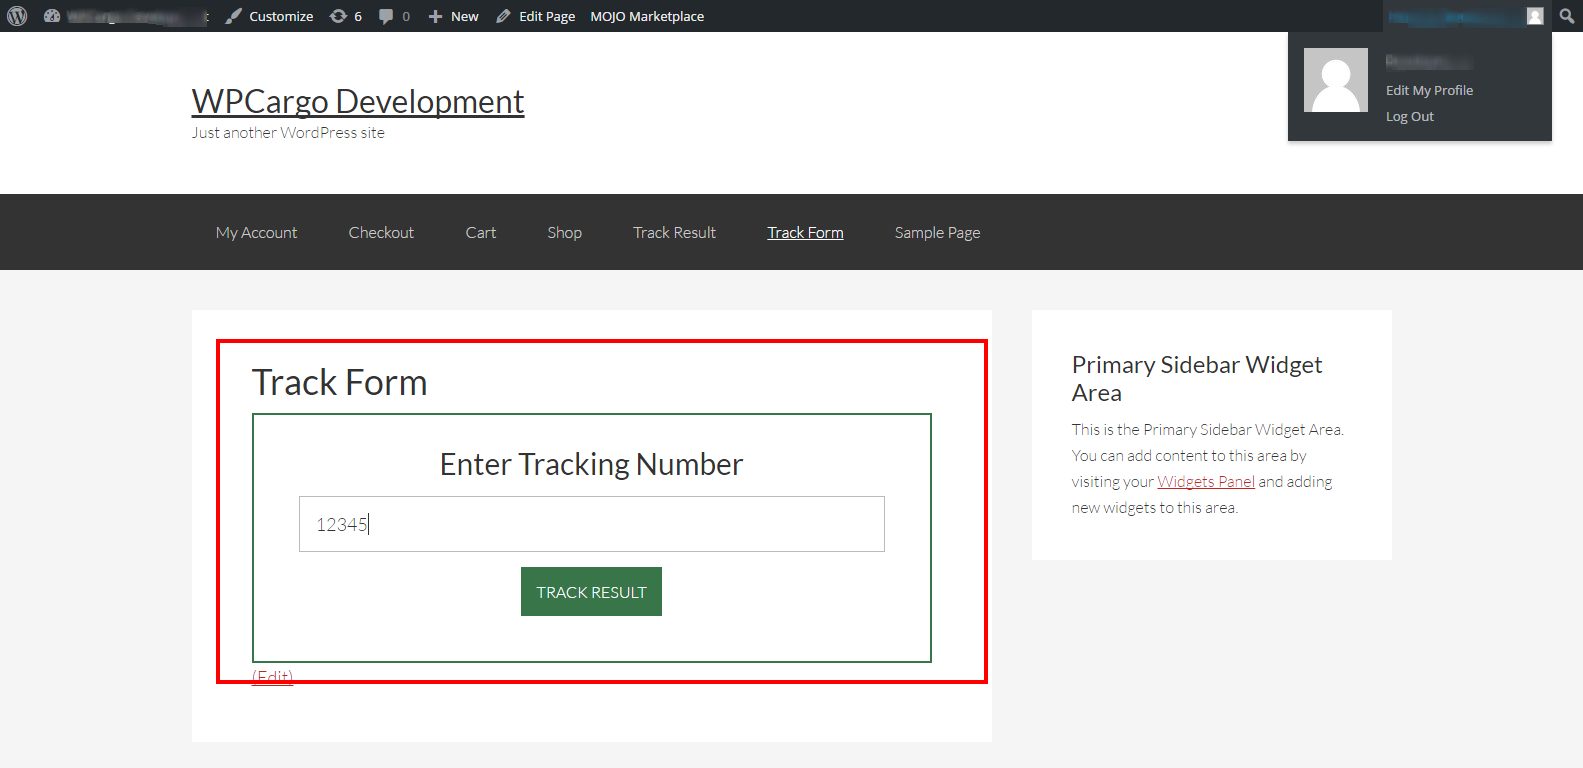
  7. Search for the tracking form page that you had setup on your Page Settings.
    Example: – http://wpcargo.com/complete-demo/

    Track Form Page
    Track Form

    Track Result Page
    Track Result

How to manually change text in WPCargo Track & Trace

[vc_row][vc_column width=”1/3″][vc_widget_sidebar sidebar_id=”sidebar_3″][/vc_column][vc_column width=”2/3″][vc_column_text]

Use the gettext filter to change any translatable string in WPCargo Track & Trace

We added the “apply filter”  to change the other Title’s on Admin and Search Results

For Example on your shipment at the admin page
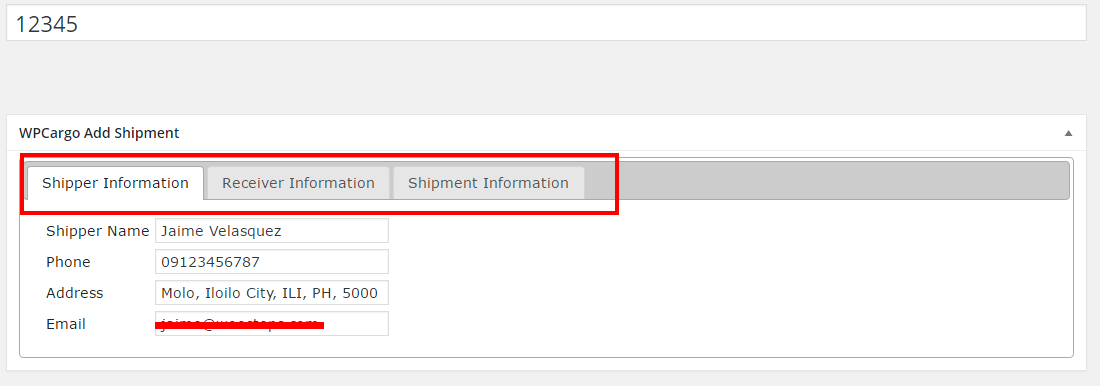
Add-shipment

If you want to change the Title you can use add_filter Hook.

add_filter('change_shipper_information','function_here');

add_filter('change_receiver_information','function_here');

add_filter('change_shipment_information','function_here');


For example on your function.php
[/vc_column_text][vc_raw_js]JTNDc2NyaXB0JTIwc3JjJTNEJTIyaHR0cHMlM0ElMkYlMkZnaXN0LmdpdGh1Yi5jb20lMkZ2aXJ0dW9zb21hc3RlciUyRjk4YjI2YThkYzM4M2Y4M2QzNzkyZTBjMGY4MDg3ZTA4LmpzJTIyJTNFJTNDJTJGc2NyaXB0JTNF[/vc_raw_js][vc_column_text]
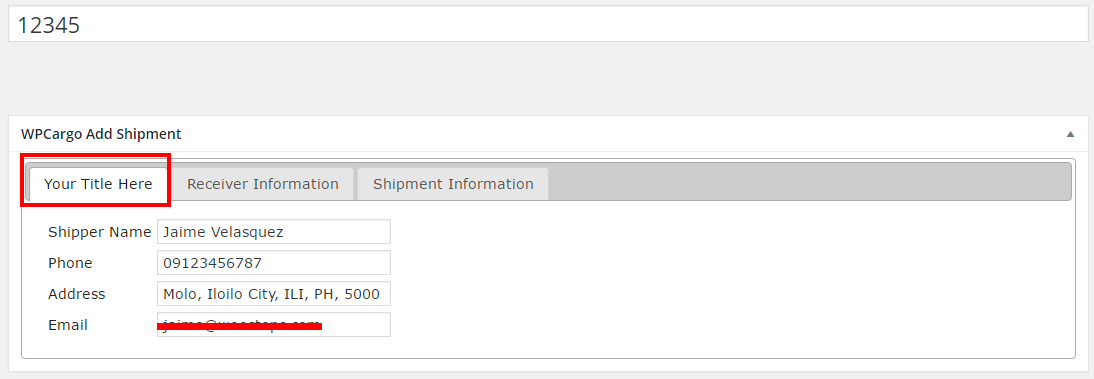
edit-title-shipment


Sample Hooks Tags

Admin

change_shipper_information –  Change the “Shipper Information” Text

change_receiver_information – Change the “Receiver Information” Text

change_shipment_information – Change the “Shipment Information” Text


Result Page

result_tracking_num – Change the “Tracking Number” Text

result_shipper_address – Change the “Shipper Address” Text

result_receiver_address – Change the “Receiver Address” Text


Shipment History

shipment_history_title – Change the “History Title”

results_history_date – Change the “Date” Text

results_history_time – Change the “Time” Text

results_history_location –  Change the “Location” Text

results_history_status – Change the “Status” Text

results_history_remarks – Change the “Remarks” Text

Guide
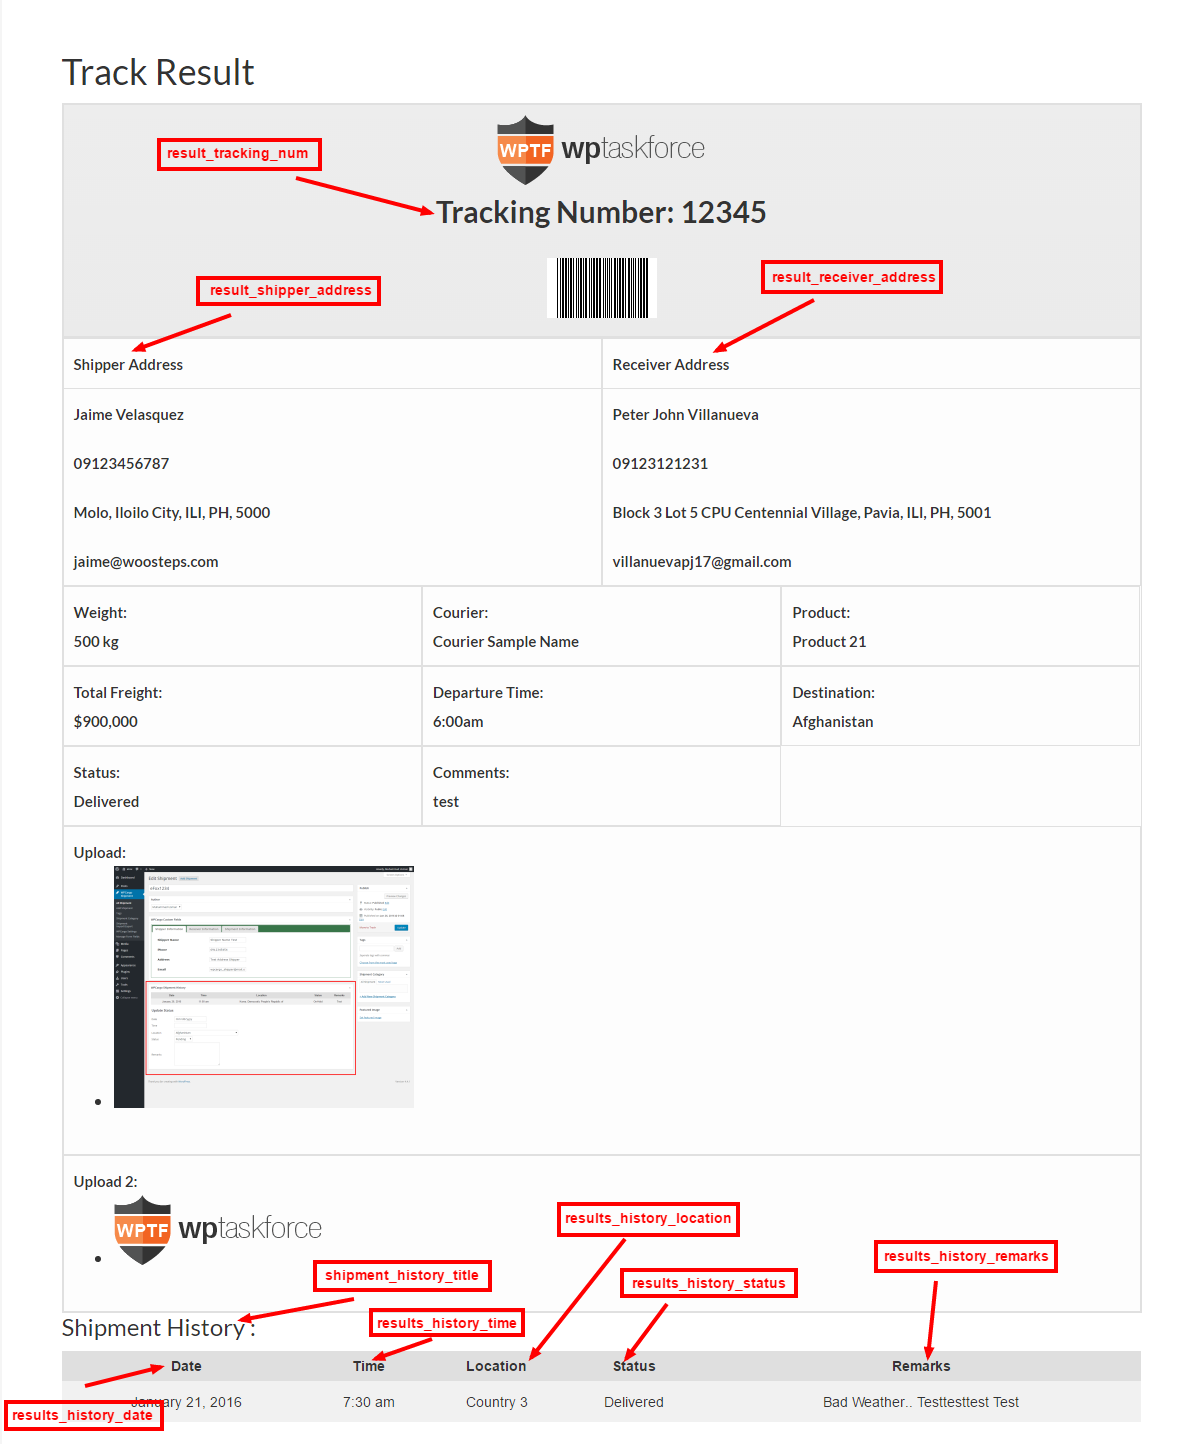
wpcargo-track-result[/vc_column_text][vc_raw_html]JTNDc2NyaXB0JTIwYXN5bmMlMjBzcmMlM0QlMjIlMkYlMkZwYWdlYWQyLmdvb2dsZXN5bmRpY2F0aW9uLmNvbSUyRnBhZ2VhZCUyRmpzJTJGYWRzYnlnb29nbGUuanMlMjIlM0UlM0MlMkZzY3JpcHQlM0UlMEElM0NpbnMlMjBjbGFzcyUzRCUyMmFkc2J5Z29vZ2xlJTIyJTBBJTIwJTIwJTIwJTIwJTIwc3R5bGUlM0QlMjJkaXNwbGF5JTNBYmxvY2slM0IlMjB0ZXh0LWFsaWduJTNBY2VudGVyJTNCJTIyJTBBJTIwJTIwJTIwJTIwJTIwZGF0YS1hZC1sYXlvdXQlM0QlMjJpbi1hcnRpY2xlJTIyJTBBJTIwJTIwJTIwJTIwJTIwZGF0YS1hZC1mb3JtYXQlM0QlMjJmbHVpZCUyMiUwQSUyMCUyMCUyMCUyMCUyMGRhdGEtYWQtY2xpZW50JTNEJTIyY2EtcHViLTA1MDY1Mzg0MjY0NTY4NzclMjIlMEElMjAlMjAlMjAlMjAlMjBkYXRhLWFkLXNsb3QlM0QlMjIxNjk0OTc1MjIyJTIyJTNFJTNDJTJGaW5zJTNFJTBBJTNDc2NyaXB0JTNFJTBBJTIwJTIwJTIwJTIwJTIwJTI4YWRzYnlnb29nbGUlMjAlM0QlMjB3aW5kb3cuYWRzYnlnb29nbGUlMjAlN0MlN0MlMjAlNUIlNUQlMjkucHVzaCUyOCU3QiU3RCUyOSUzQiUwQSUzQyUyRnNjcmlwdCUzRQ==[/vc_raw_html][/vc_column][/vc_row]

How to Install and add License Key to the WPCargo Add ons

[vc_row][vc_column width=”1/3″][vc_widget_sidebar sidebar_id=”sidebar_3″][/vc_column][vc_column width=”2/3″][vc_column_text]

How to Install and add License Key to the WPCargo Add ons

Steps on how to install the add-ons.

1. Download the plugins emailed after you successfully bought it.

2. Install the WPTaskForce Helper

3. Install the Add-ons

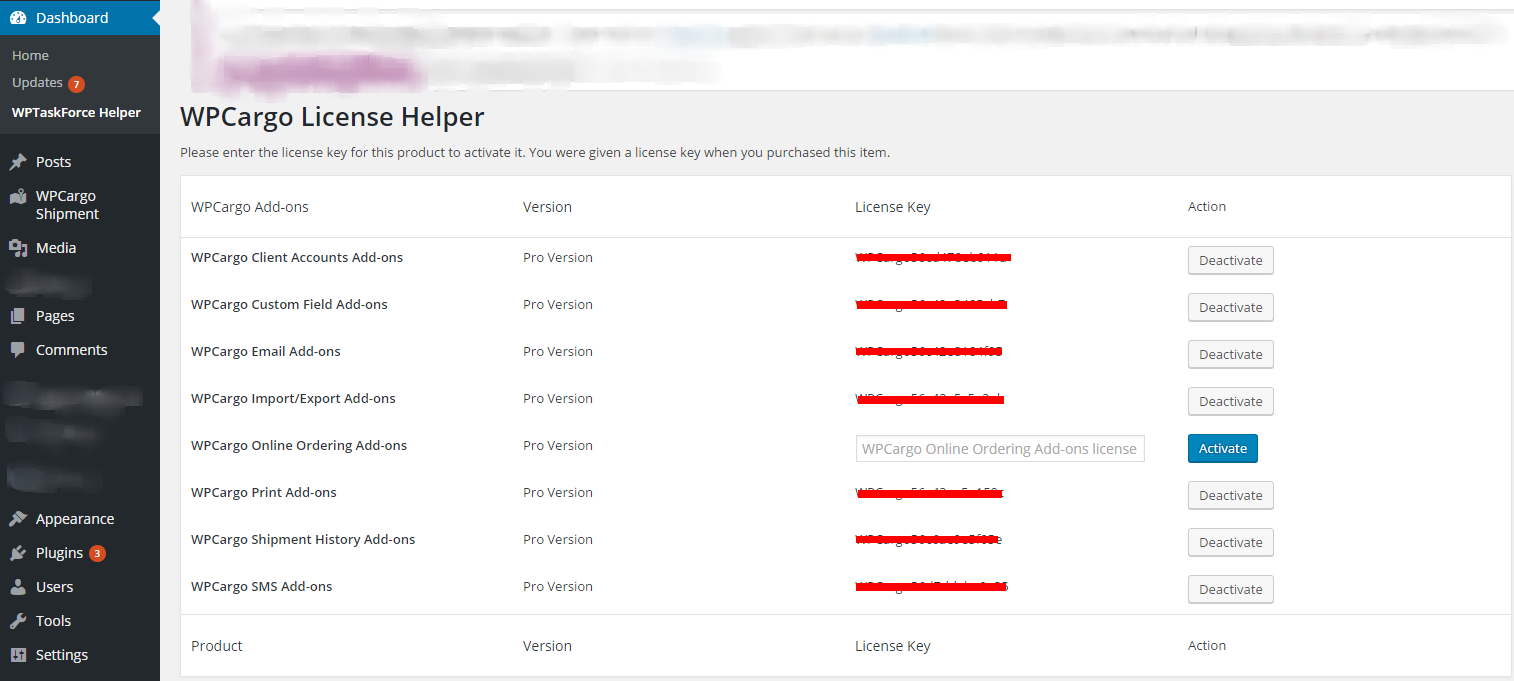
4. After you Install the plugins go to your admin Dashboard->WPTaskForce Helper then put the License given after you bought the plugin successfully.

WPTaskForce License Helper ‹ WPCargo Development — WordPress[/vc_column_text][vc_raw_html]JTNDc2NyaXB0JTIwYXN5bmMlMjBzcmMlM0QlMjIlMkYlMkZwYWdlYWQyLmdvb2dsZXN5bmRpY2F0aW9uLmNvbSUyRnBhZ2VhZCUyRmpzJTJGYWRzYnlnb29nbGUuanMlMjIlM0UlM0MlMkZzY3JpcHQlM0UlMEElM0NpbnMlMjBjbGFzcyUzRCUyMmFkc2J5Z29vZ2xlJTIyJTBBJTIwJTIwJTIwJTIwJTIwc3R5bGUlM0QlMjJkaXNwbGF5JTNBYmxvY2slM0IlMjB0ZXh0LWFsaWduJTNBY2VudGVyJTNCJTIyJTBBJTIwJTIwJTIwJTIwJTIwZGF0YS1hZC1sYXlvdXQlM0QlMjJpbi1hcnRpY2xlJTIyJTBBJTIwJTIwJTIwJTIwJTIwZGF0YS1hZC1mb3JtYXQlM0QlMjJmbHVpZCUyMiUwQSUyMCUyMCUyMCUyMCUyMGRhdGEtYWQtY2xpZW50JTNEJTIyY2EtcHViLTA1MDY1Mzg0MjY0NTY4NzclMjIlMEElMjAlMjAlMjAlMjAlMjBkYXRhLWFkLXNsb3QlM0QlMjIxNjk0OTc1MjIyJTIyJTNFJTNDJTJGaW5zJTNFJTBBJTNDc2NyaXB0JTNFJTBBJTIwJTIwJTIwJTIwJTIwJTI4YWRzYnlnb29nbGUlMjAlM0QlMjB3aW5kb3cuYWRzYnlnb29nbGUlMjAlN0MlN0MlMjAlNUIlNUQlMjkucHVzaCUyOCU3QiU3RCUyOSUzQiUwQSUzQyUyRnNjcmlwdCUzRQ==[/vc_raw_html][/vc_column][/vc_row]
How to use WPCargo SMS Integration Addons

[vc_row][vc_column width=”1/4″][vc_widget_sidebar sidebar_id=”sidebar_3″][/vc_column][vc_column width=”3/4″][vc_column_text]

How to setup and use the WPCargo SMS Integration Addons

WPCargo can now send an automated message on your client’s to see the updates of there shipments!

WPCargo SMS Integration supports  One Way SMS, Twilio.com and Mobily.ws.


ONE WAY SMS

The Plugin is connected to One Way SMS so you need to create an account or contact there sales – sales@onewaysms.ph

( You can try there Free Trial Account to test )

Please follow these steps below..

  1. After you created an Account, get the API Username and API Password under the Account->API
    API
  2. We also need the number that you have registered on your One Way SMS account, you can see it under the Account->Account Detail
  3. Now Install the WPCargo SMS Add-ons on your Web Server
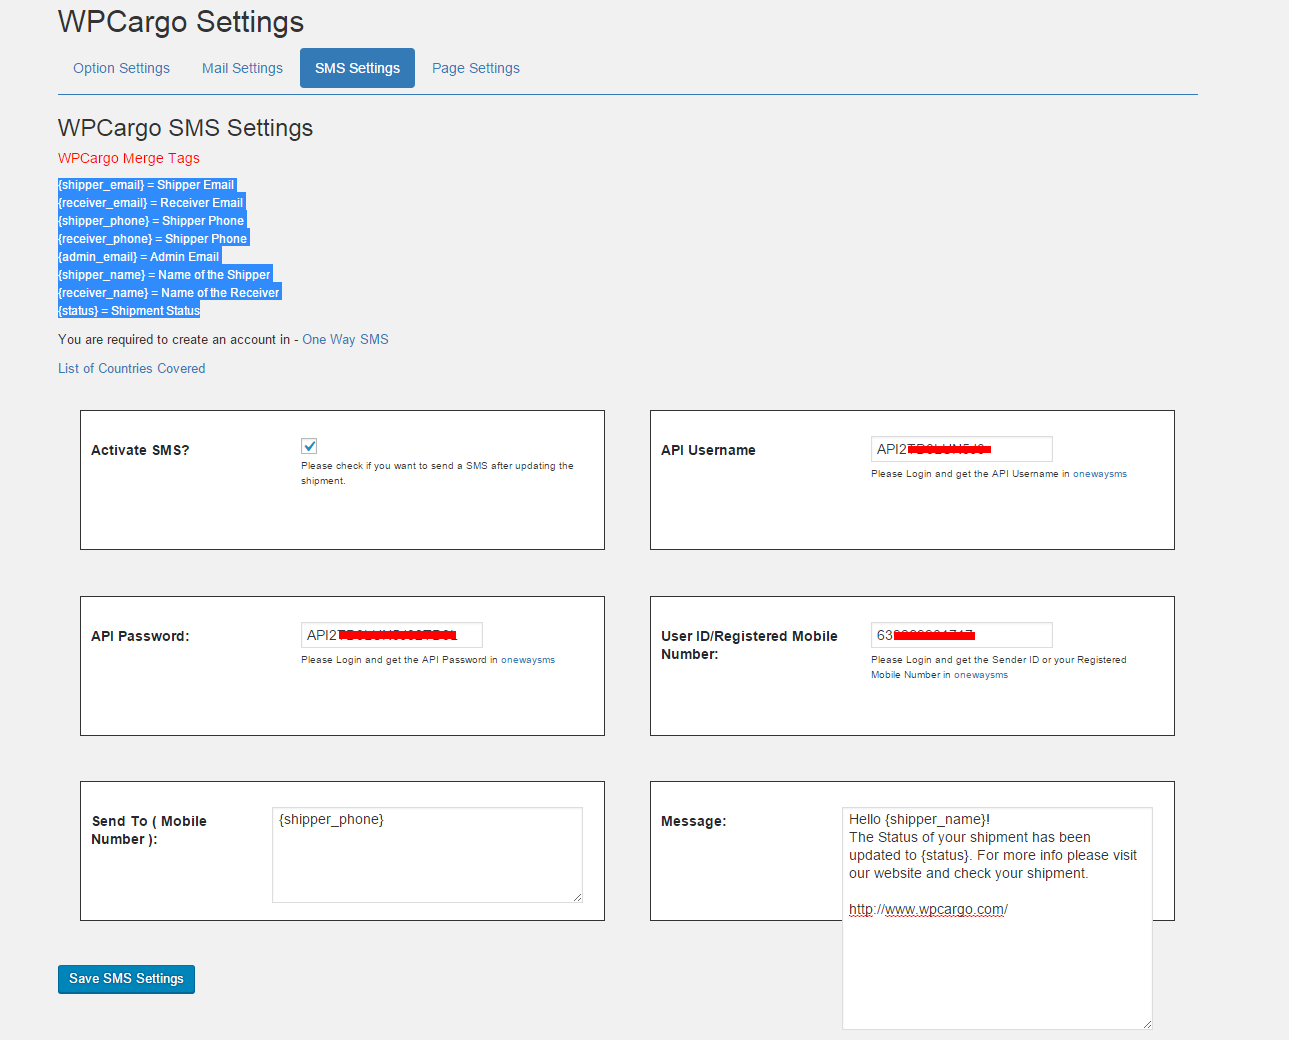
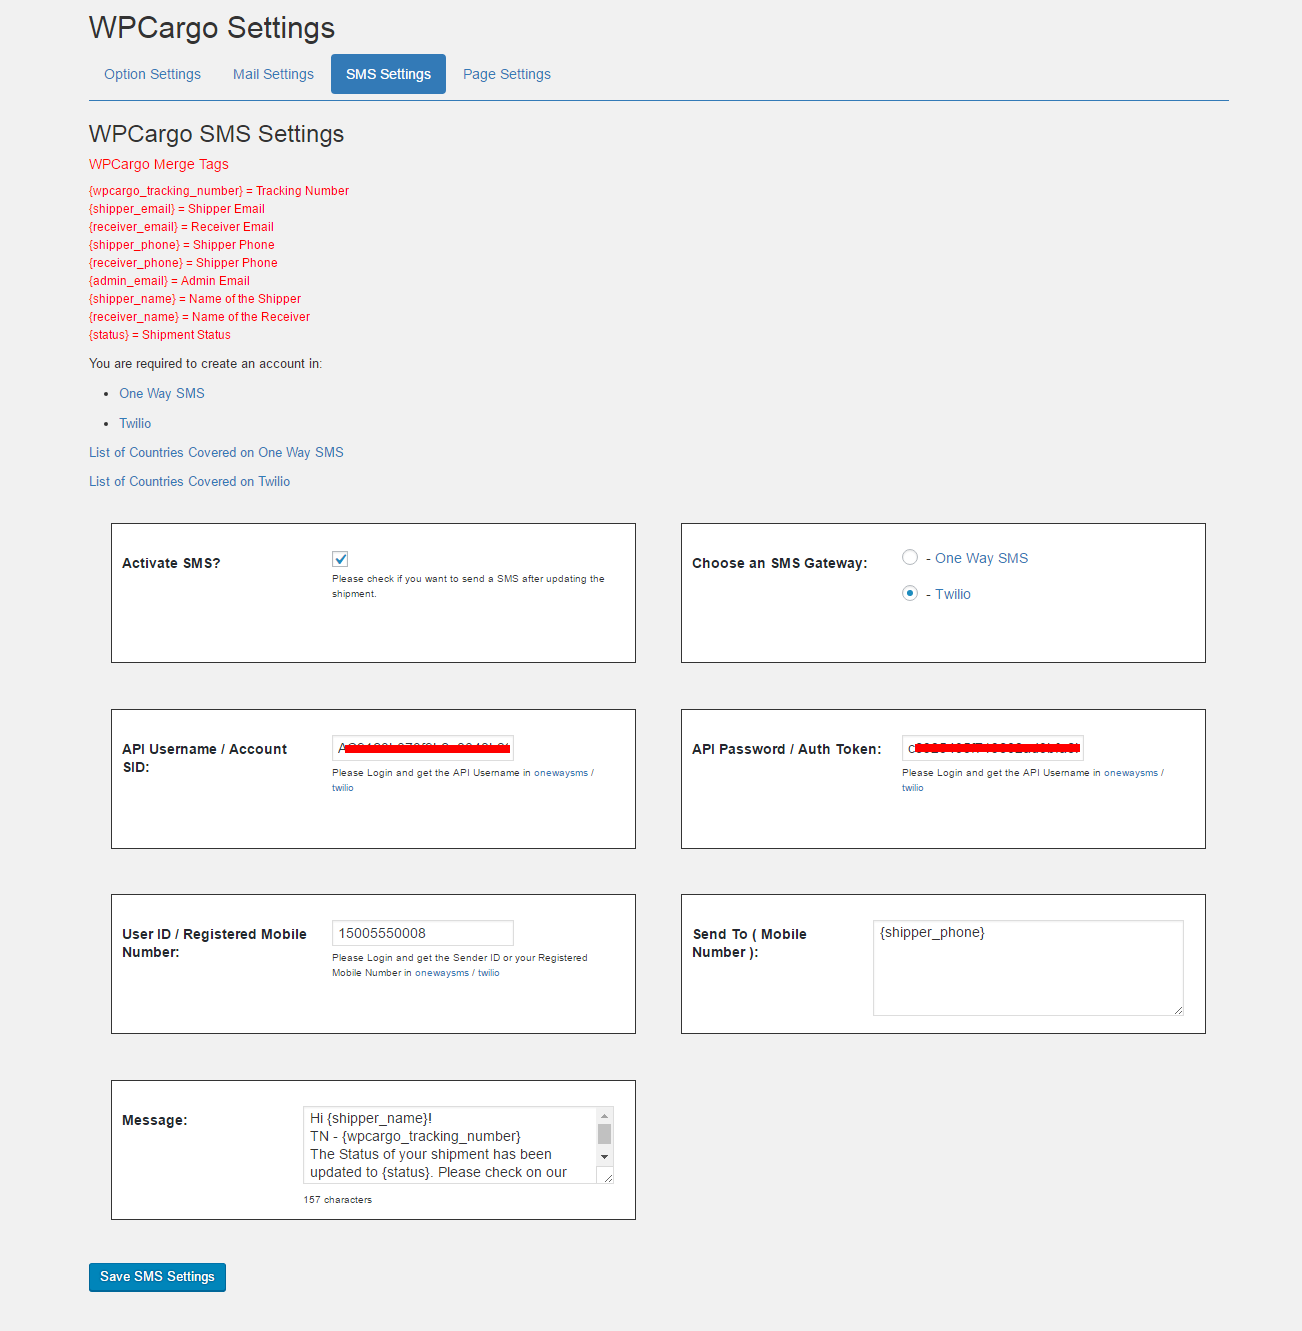
  4. After you install the WPCargo SMS Add-ons, Please go to WPCargo Shipment->WPCargo Settings->SMS Settings and fill up the details below.
    • API Username – Please login to your One Way SMS Account to view API’s
    • API Password – Please login to your One Way SMS Account to view API’s
    • User ID/Registered Mobile Number – The Number Registered on your One Way SMS Account
    • Send To ( Mobile Number ) – Phone Numbers that you want to send to, you can use WPCargo Merge Tags.(Ex. {shipper_phone},{receiver_phone})
    • Message – Text Message, you can use WPCargo Merge Tags

Note for the Phone Numbers, Country Code First then the number. Ex. 6391111222222

WPCargo Merge Tags

  • {wpcargo_tracking_number} = Tracking Number
  • {shipper_email} = Shipper Email
  • {receiver_email} = Receiver Email
  • {shipper_phone} = Shipper Phone
  • {receiver_phone} = Shipper Phone
  • {admin_email} = Admin Email
  • {shipper_name} = Name of the Shipper
  • {receiver_name} = Name of the Receiver
  • {status} = Shipment Status

SMS
You can now send a message after you updated the Shipment!


TWILIO

For the latest version of WPCargo it is now connected to Twilio so you need to create an account.

Please follow these steps below..

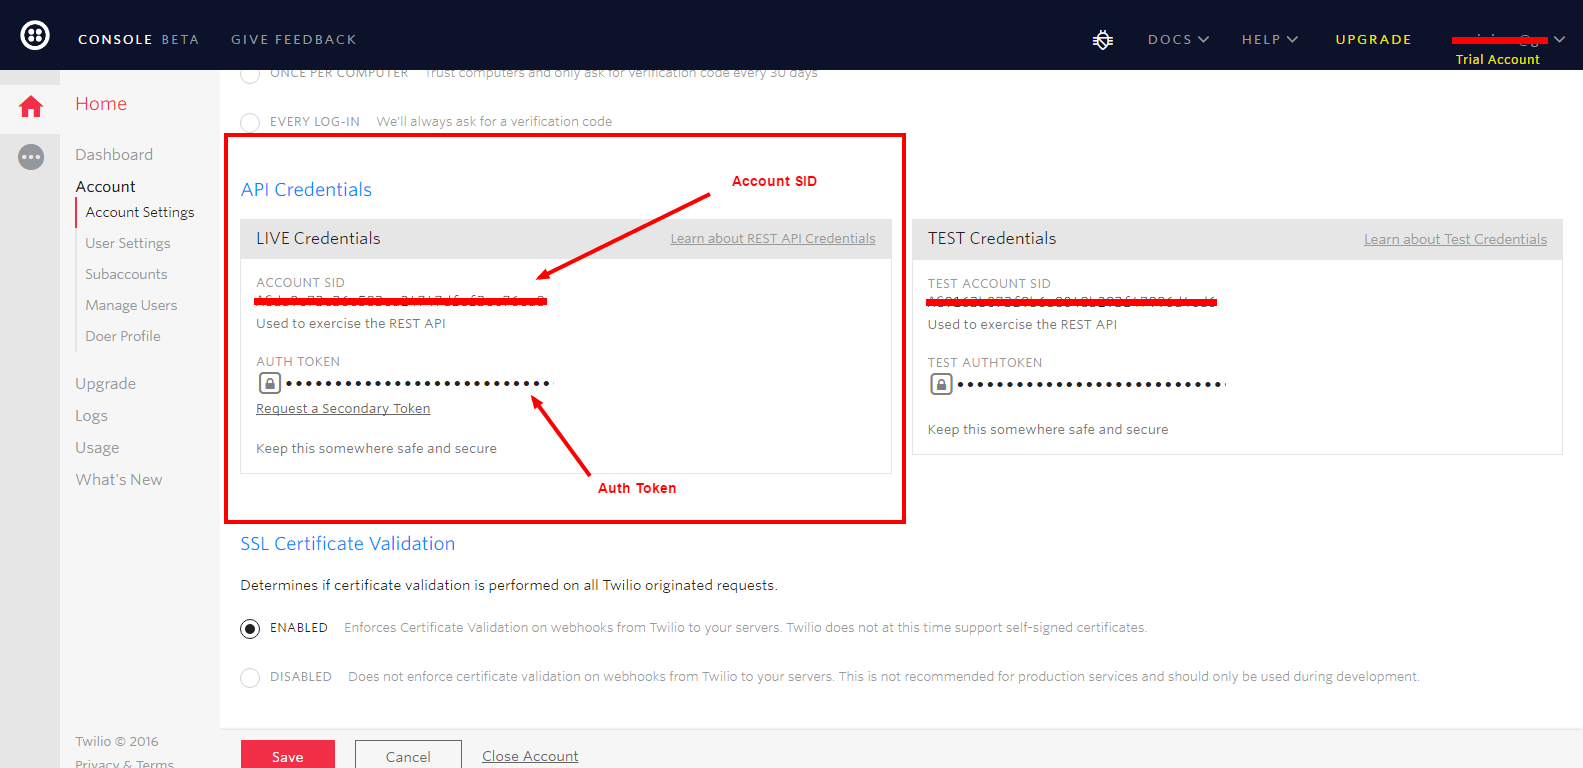
  1. After you created an Account, get the API Account SID and Auth TokenTwilio Console
  2. We also need the number that you have registered on your Twilio account, you can see it under the Account>User Settings
  3. Now Install the WPCargo SMS Add-ons on your Web Server
  4. After you install the WPCargo SMS Add-ons, Please go to WPCargo Shipment->WPCargo Settings->SMS Settings and fill up the details below.
    • API Username / Account SID – Please login to your Twilio Account to view API’s
    • API Password / Auth Token – Please login to your Twilio Account to view API’s
    • User ID / Registered Mobile Number – The Number Registered on your One Way SMS Account
    • Send To ( Mobile Number ) – Phone Numbers that you want to send to, you can use WPCargo Merge Tags.( Ex. {shipper_phone},{receiver_phone} )
    • Message – Text Message, you can use WPCargo Merge Tags

Notes

  • For the Phone Numbers, Country Code First then the number. Ex. 6391111222222
  • Messages has a 160 characters, for more info please refer to twilio documentation – https://www.twilio.com/help/faq/sms/does-twilio-support-concatenated-sms-messages-or-messages-over-160-characters

WPCargo Merge Tags

  • {wpcargo_tracking_number} = Tracking Number
  • {shipper_email} = Shipper Email
  • {receiver_email} = Receiver Email
  • {shipper_phone} = Shipper Phone
  • {receiver_phone} = Shipper Phone
  • {admin_email} = Admin Email
  • {shipper_name} = Name of the Shipper
  • {receiver_name} = Name of the Receiver
  • {status} = Shipment Status


WPCargo SMS[/vc_column_text][vc_raw_html]JTNDc2NyaXB0JTIwYXN5bmMlMjBzcmMlM0QlMjIlMkYlMkZwYWdlYWQyLmdvb2dsZXN5bmRpY2F0aW9uLmNvbSUyRnBhZ2VhZCUyRmpzJTJGYWRzYnlnb29nbGUuanMlMjIlM0UlM0MlMkZzY3JpcHQlM0UlMEElM0NpbnMlMjBjbGFzcyUzRCUyMmFkc2J5Z29vZ2xlJTIyJTBBJTIwJTIwJTIwJTIwJTIwc3R5bGUlM0QlMjJkaXNwbGF5JTNBYmxvY2slM0IlMjB0ZXh0LWFsaWduJTNBY2VudGVyJTNCJTIyJTBBJTIwJTIwJTIwJTIwJTIwZGF0YS1hZC1sYXlvdXQlM0QlMjJpbi1hcnRpY2xlJTIyJTBBJTIwJTIwJTIwJTIwJTIwZGF0YS1hZC1mb3JtYXQlM0QlMjJmbHVpZCUyMiUwQSUyMCUyMCUyMCUyMCUyMGRhdGEtYWQtY2xpZW50JTNEJTIyY2EtcHViLTA1MDY1Mzg0MjY0NTY4NzclMjIlMEElMjAlMjAlMjAlMjAlMjBkYXRhLWFkLXNsb3QlM0QlMjIxNjk0OTc1MjIyJTIyJTNFJTNDJTJGaW5zJTNFJTBBJTNDc2NyaXB0JTNFJTBBJTIwJTIwJTIwJTIwJTIwJTI4YWRzYnlnb29nbGUlMjAlM0QlMjB3aW5kb3cuYWRzYnlnb29nbGUlMjAlN0MlN0MlMjAlNUIlNUQlMjkucHVzaCUyOCU3QiU3RCUyOSUzQiUwQSUzQyUyRnNjcmlwdCUzRQ==[/vc_raw_html][/vc_column][/vc_row]
How to add or update pre-define options list on dropdown custom fields?

[vc_row][vc_column width=”1/3″][vc_widget_sidebar sidebar_id=”sidebar_3″][/vc_column][vc_column width=”2/3″][vc_column_text]

How to add or update pre-define options list on dropdown custom fields?

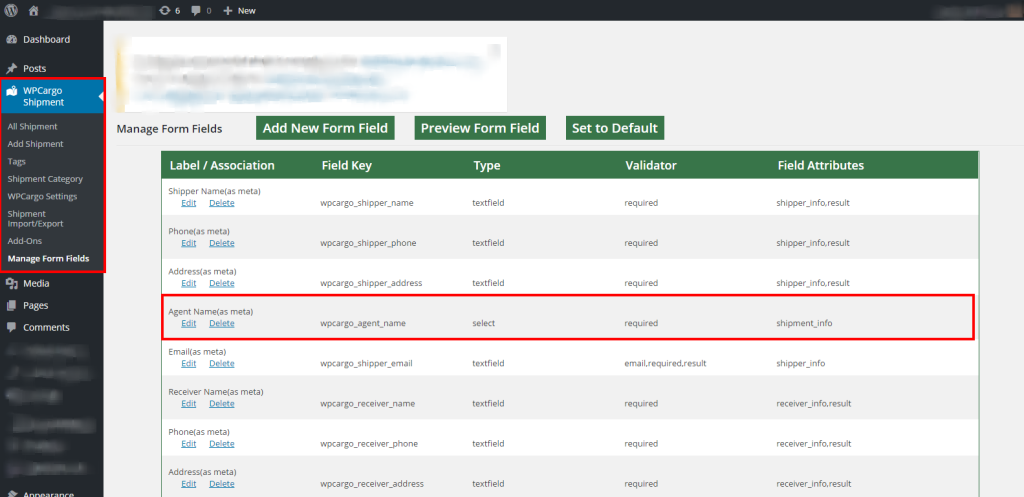
  1. On your Admin Dashboard click WPCargo Shipment->Manage Form Fields and Choose the Fields that you want to edit the OptionWPCargo-edit-option
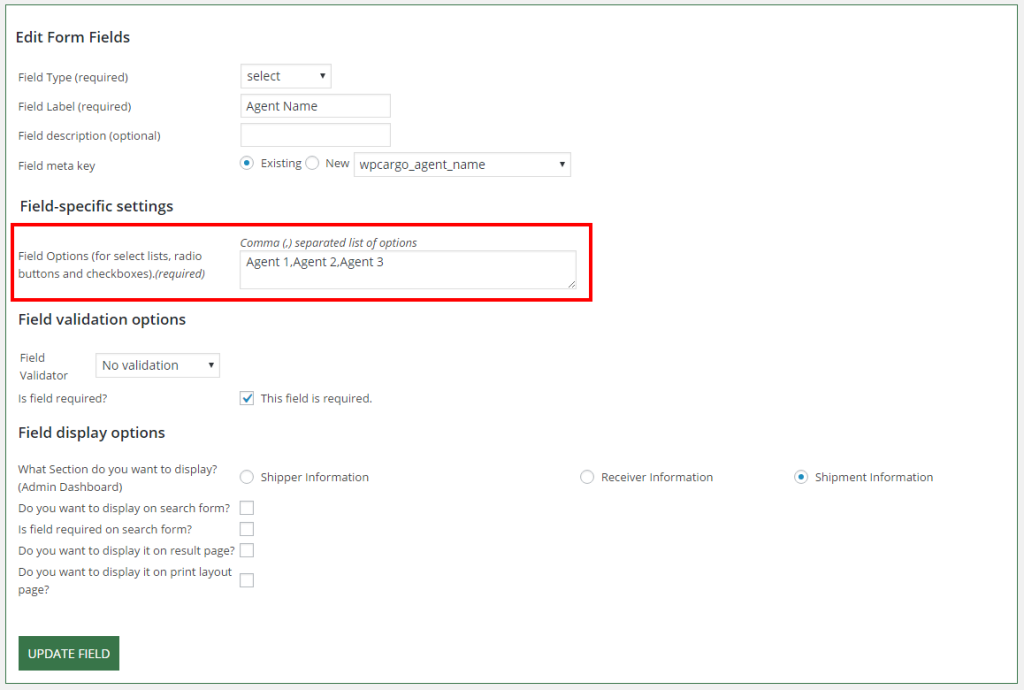
  2. Edit the Field Options with comma separated on each option.For Example
    Agent 1,Agent 2,Agent 3Agents

[/vc_column_text][vc_raw_html]JTNDc2NyaXB0JTIwYXN5bmMlMjBzcmMlM0QlMjIlMkYlMkZwYWdlYWQyLmdvb2dsZXN5bmRpY2F0aW9uLmNvbSUyRnBhZ2VhZCUyRmpzJTJGYWRzYnlnb29nbGUuanMlMjIlM0UlM0MlMkZzY3JpcHQlM0UlMEElM0NpbnMlMjBjbGFzcyUzRCUyMmFkc2J5Z29vZ2xlJTIyJTBBJTIwJTIwJTIwJTIwJTIwc3R5bGUlM0QlMjJkaXNwbGF5JTNBYmxvY2slM0IlMjB0ZXh0LWFsaWduJTNBY2VudGVyJTNCJTIyJTBBJTIwJTIwJTIwJTIwJTIwZGF0YS1hZC1sYXlvdXQlM0QlMjJpbi1hcnRpY2xlJTIyJTBBJTIwJTIwJTIwJTIwJTIwZGF0YS1hZC1mb3JtYXQlM0QlMjJmbHVpZCUyMiUwQSUyMCUyMCUyMCUyMCUyMGRhdGEtYWQtY2xpZW50JTNEJTIyY2EtcHViLTA1MDY1Mzg0MjY0NTY4NzclMjIlMEElMjAlMjAlMjAlMjAlMjBkYXRhLWFkLXNsb3QlM0QlMjIxNjk0OTc1MjIyJTIyJTNFJTNDJTJGaW5zJTNFJTBBJTNDc2NyaXB0JTNFJTBBJTIwJTIwJTIwJTIwJTIwJTI4YWRzYnlnb29nbGUlMjAlM0QlMjB3aW5kb3cuYWRzYnlnb29nbGUlMjAlN0MlN0MlMjAlNUIlNUQlMjkucHVzaCUyOCU3QiU3RCUyOSUzQiUwQSUzQyUyRnNjcmlwdCUzRQ==[/vc_raw_html][/vc_column][/vc_row]
How to add Image Upload or File Upload?

[vc_row][vc_column width=”1/3″][vc_widget_sidebar sidebar_id=”sidebar_3″][/vc_column][vc_column width=”2/3″][vc_column_text]

How to add Image Upload or File Upload?

Please follow these steps on how to add a image/file upload fields:

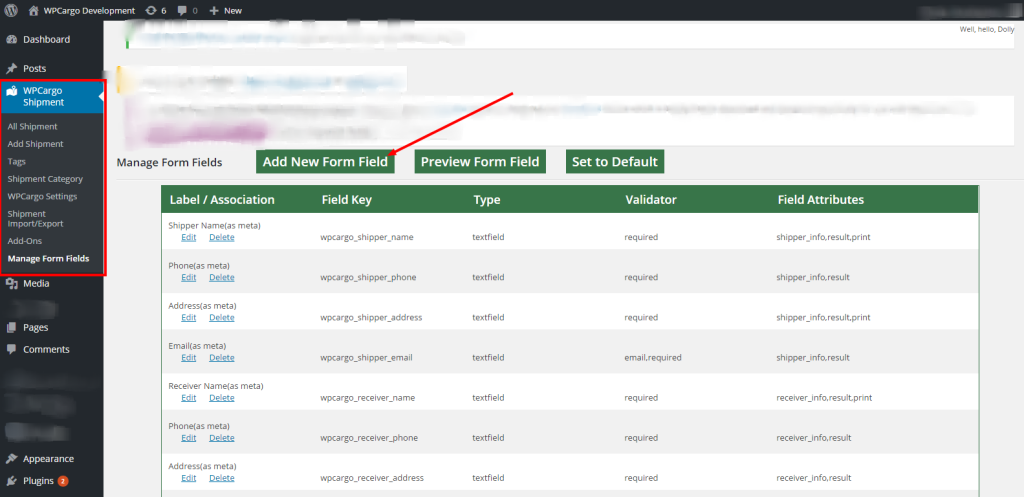
  1. Go to your admin dashboard->WPCargo Shipment->Manage Form Fields->Add New Form Field.

Add New Form Field


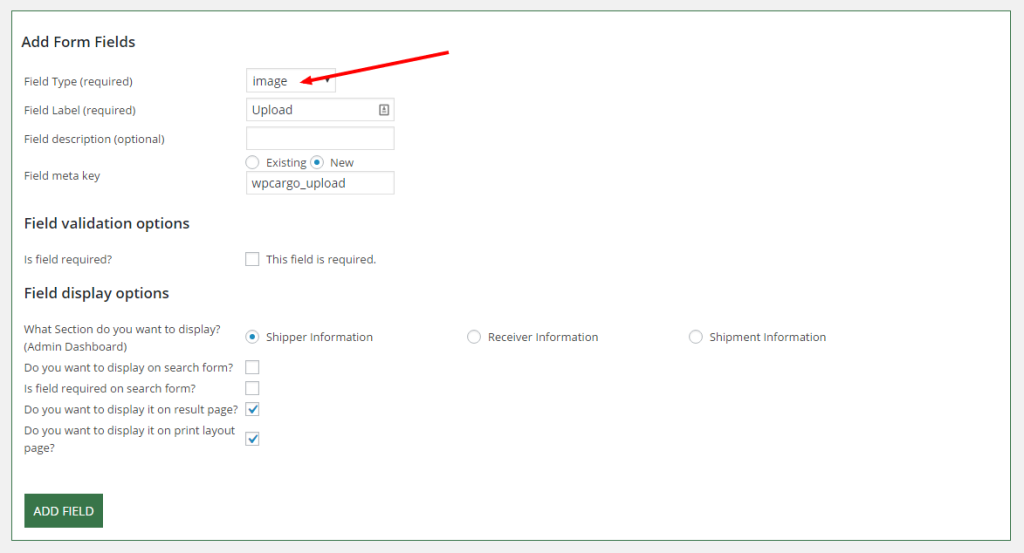
2. On FIeld Type Choose “Image” and fill up the form settings.

Form

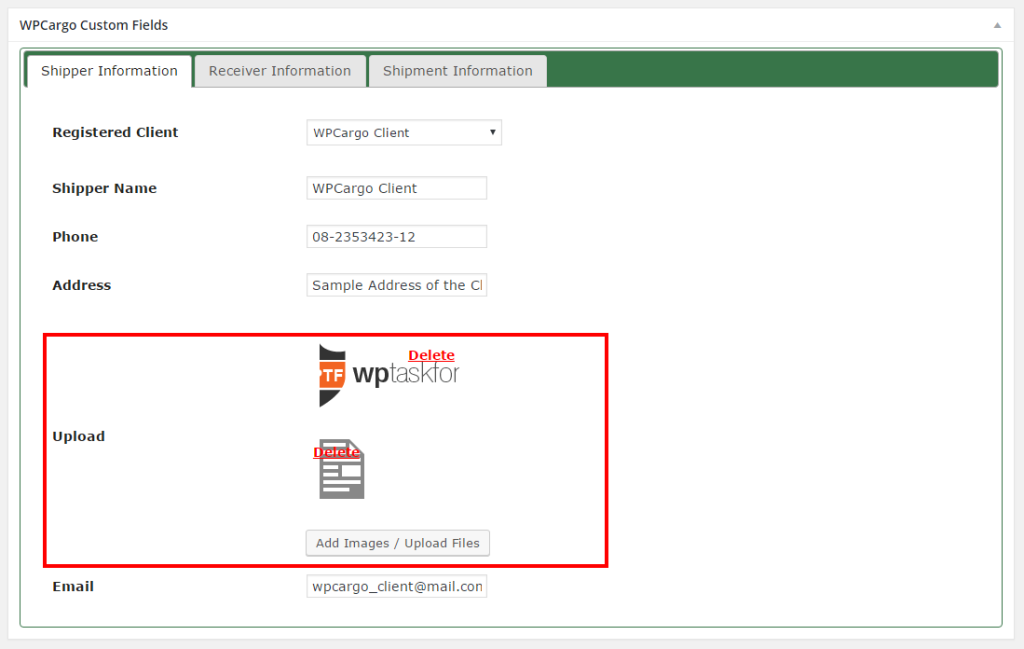
3. You can now add the File or Images on your shipments

Add Shipments

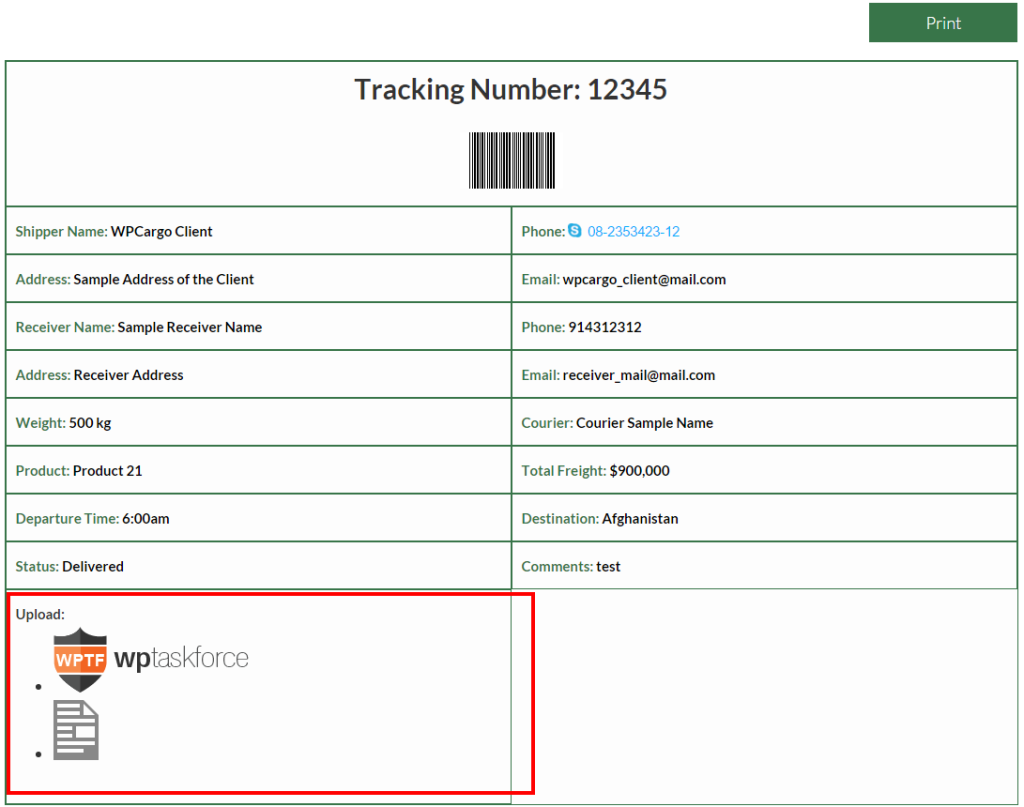
Sample Result Page

Track Result

[/vc_column_text][vc_raw_html]JTNDc2NyaXB0JTIwYXN5bmMlMjBzcmMlM0QlMjIlMkYlMkZwYWdlYWQyLmdvb2dsZXN5bmRpY2F0aW9uLmNvbSUyRnBhZ2VhZCUyRmpzJTJGYWRzYnlnb29nbGUuanMlMjIlM0UlM0MlMkZzY3JpcHQlM0UlMEElM0NpbnMlMjBjbGFzcyUzRCUyMmFkc2J5Z29vZ2xlJTIyJTBBJTIwJTIwJTIwJTIwJTIwc3R5bGUlM0QlMjJkaXNwbGF5JTNBYmxvY2slM0IlMjB0ZXh0LWFsaWduJTNBY2VudGVyJTNCJTIyJTBBJTIwJTIwJTIwJTIwJTIwZGF0YS1hZC1sYXlvdXQlM0QlMjJpbi1hcnRpY2xlJTIyJTBBJTIwJTIwJTIwJTIwJTIwZGF0YS1hZC1mb3JtYXQlM0QlMjJmbHVpZCUyMiUwQSUyMCUyMCUyMCUyMCUyMGRhdGEtYWQtY2xpZW50JTNEJTIyY2EtcHViLTA1MDY1Mzg0MjY0NTY4NzclMjIlMEElMjAlMjAlMjAlMjAlMjBkYXRhLWFkLXNsb3QlM0QlMjIxNjk0OTc1MjIyJTIyJTNFJTNDJTJGaW5zJTNFJTBBJTNDc2NyaXB0JTNFJTBBJTIwJTIwJTIwJTIwJTIwJTI4YWRzYnlnb29nbGUlMjAlM0QlMjB3aW5kb3cuYWRzYnlnb29nbGUlMjAlN0MlN0MlMjAlNUIlNUQlMjkucHVzaCUyOCU3QiU3RCUyOSUzQiUwQSUzQyUyRnNjcmlwdCUzRQ==[/vc_raw_html][/vc_column][/vc_row]
How to customized your own results?

Steps on how to customized your results

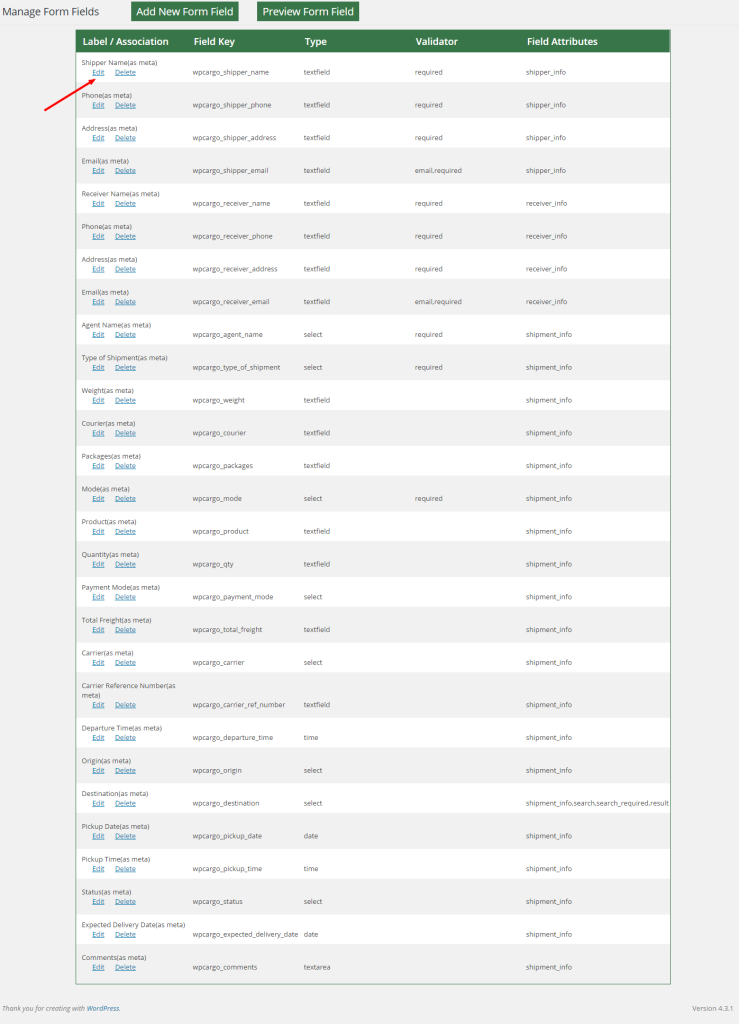
  1. Go to WPCargo Shipment->Manage Form Fields

manage-form-fields

2. Choose a Field that you want to add it on your search form and click edit

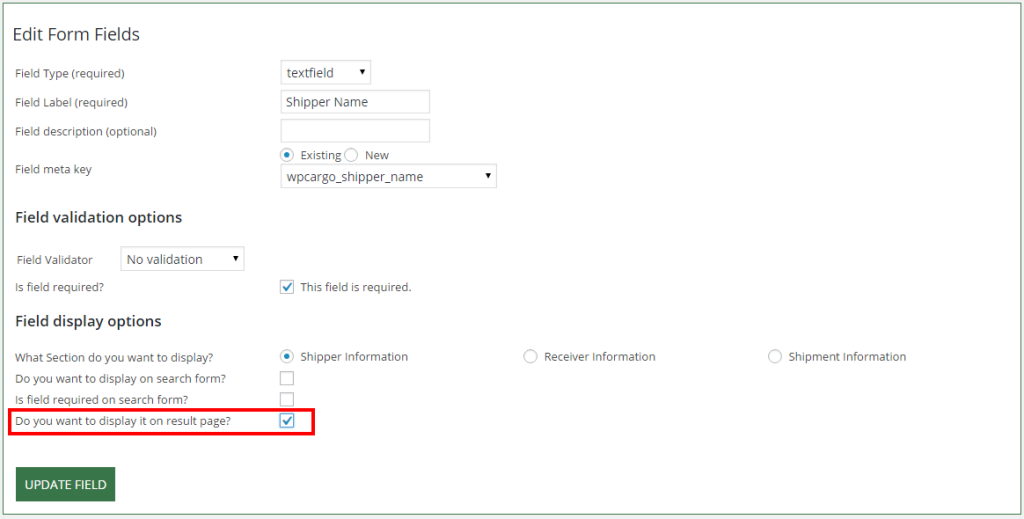
3. In Edit Form Field Page there’s an option for displaying results

– Do you want to display it on result page?

edit-form-res

4. When your done click UPDATE FIELD

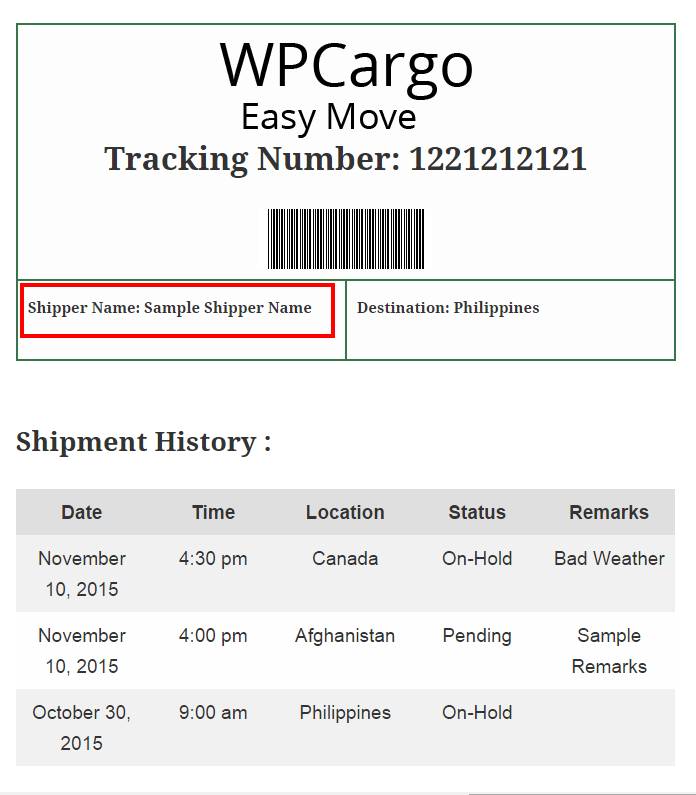
5. Check your result Page

Result Page