How to Install, Activate and Set-up WPCargo Address Book Add-ons
REQUIREMENTS:
- IONCUBE Version 10.3
- PHP 7.2
This add-on requires the following plugins:
- WPCargo Track and Trace
- WPTaskforce License Helper – comes with any products purchased
- WPCargo Custom Field Add-ons
Install and activate required plugins.
- SetupWPCargo Track and Trace plugin.
- Install and activate WPTaskforce License Helper.
- SetupWPCargo Custom Field Add-ons.
Install and Activate WPCargo Address Book Add-ons
- Check the order confirmation email with the list of products purchased and download the WPCargo Address Book Add-ons.
- Login to your wp-admin.
- Go to Dashboard > Plugins > Add New > Upload.
- Select the downloaded plugin.
- Install the plugin.
- Activate the plugin.
Activate WPCargo Address Book Add-ons license key
- To acquire your license key, please refer to the mode of payment you have used when product was purchased.
- Purchased through PayPal – an email will be sent to the email you have provided on the order details including the license key of the product.
- Purchased through Western Union – email the MTCN to info@wpcargo.com. When payment is received, an email will be sent with the order details including the license key of the product.
- Copy WPCargo Address Book Add-ons license key.
- Go to Dashboard > WPCargo > WPTaskforce License Helper.
- Paste license key to WPCargo Address Book Add-ons field and click the Activate button.

NOTE:
Address Book is only accessible to users who are allowed to create shipments. To allow users to create shipments, check here.
SET-UP
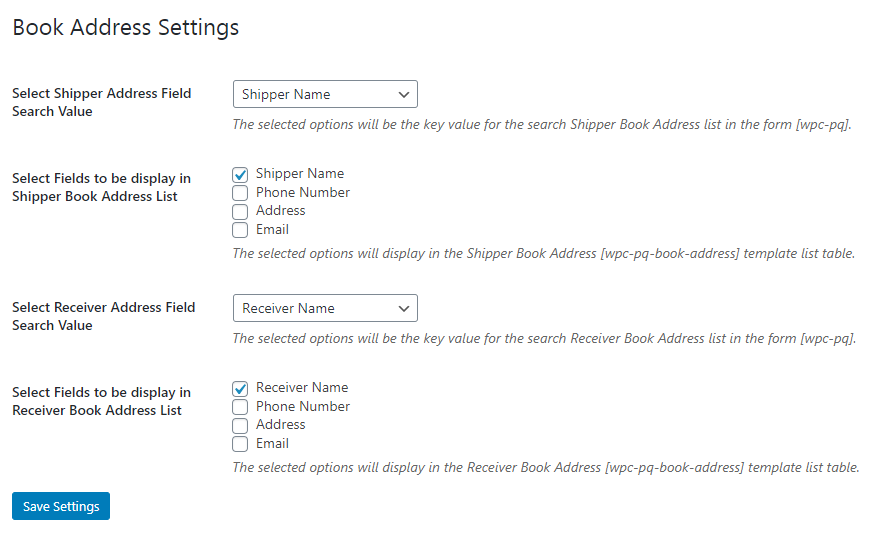
9. Go to Dashboard > WPCargo > Address Book Settings
10. Scroll the page to Book Address Settings and select the field to be displayed in the address book list.
Note: If none has been checked, address book dropdown will not be visible when creating shipment.
11. Choose what field will be displayed on search from Select Address Field Search Value field.
12. Click Save Settings to save the changes.

